Basement DIY docs
Info and stuff on DIY basement stuff
- FDM / FFF 3D Printers
- Start here for using Ridgewood Commons 3D Printers
- Bambu P1S
- Ultimaker S5 general info
- Ultimaker S5 - Zorro
- Ultimaker S5 - Luna
- Qidi - Q1 Pro
- Resources & Links
- 101s
- Contact Mics
- Screenprinting rebuild
- Looms & Weaving
- Presentation Slide Decks
- Resin 3D Printing
- Food Safe Materials
- Tape Loops
- Papercraft
FDM / FFF 3D Printers
General info links on FDM/FFF 3D printing, and specific information on machines in basement.
Fused Deposition Modeling (FDM) is the most common term for this printing technology, but the term was/is copyright. Fused Filament Fabrication (FFF) was coined by the open-source RepRap (Wikipedia) community in 2005 to avoid legal issues.
If you're new to FFF printing, this is a decent general overview: https://all3dp.com/2/3d-printing-for-beginners-all-you-need-to-know-to-get-started/ (Full article, 3,000 words, broken into small section.)
Start here for using Ridgewood Commons 3D Printers
3D printing is a pretty straightforward idea, but in practice there are a lot of ways for it to mess up.
Here are some basics for best practices of using 3D printers at RC.
Current Printers
Current printers are all listed on the front page of this chapter.
Bambu P1S
Basics
- Our most reliable FDM/FFF printer.
- Use a microSD card to transfer files to printer.
- Print in PLA only.
- (If you have experience troubleshooting and tuning for bed adhesion and nozzle clogs, use matte, silk, and petg, but you will be responsible for returning the printer to usable condition in case of any issues)
Ultimaker S5 general info
The Basics (from manual)
RC has two Ultimaker S5 FDM printers.
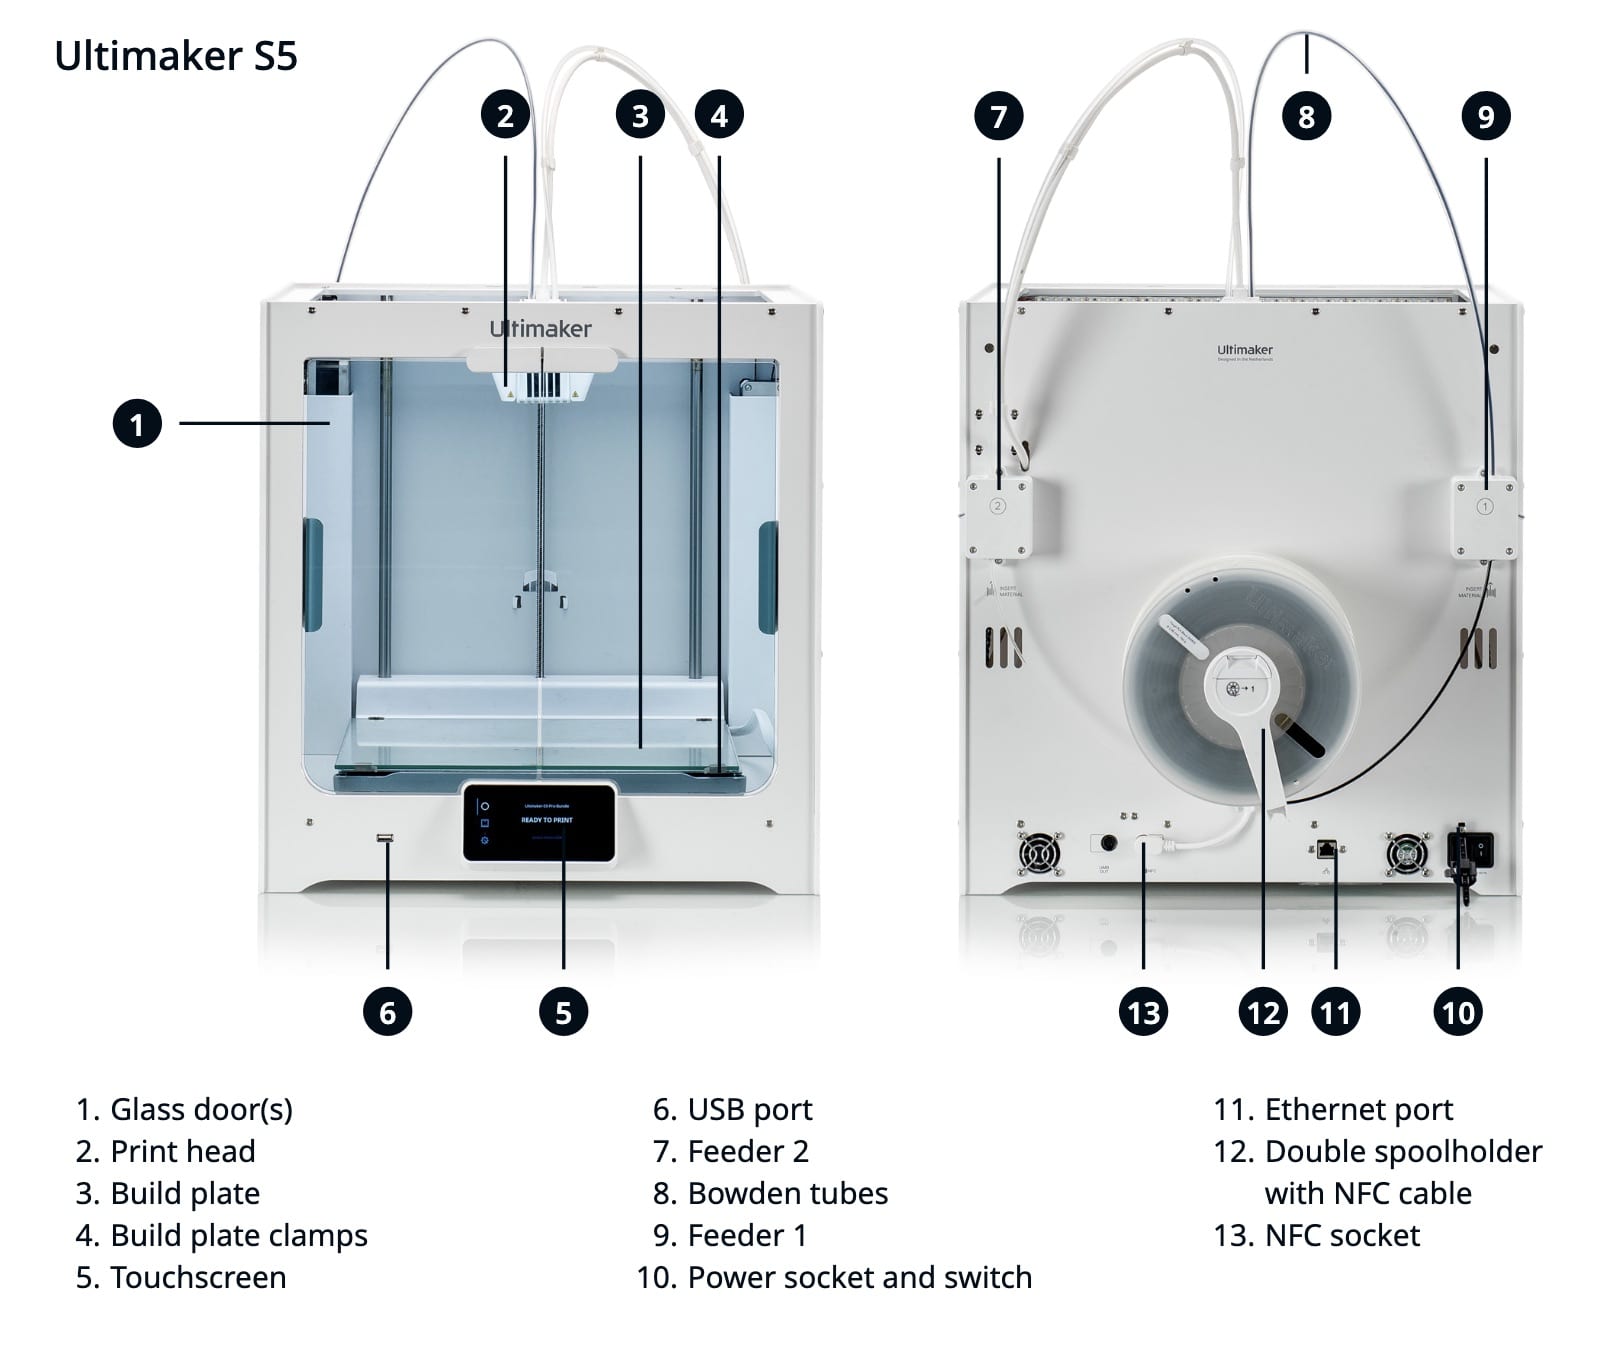
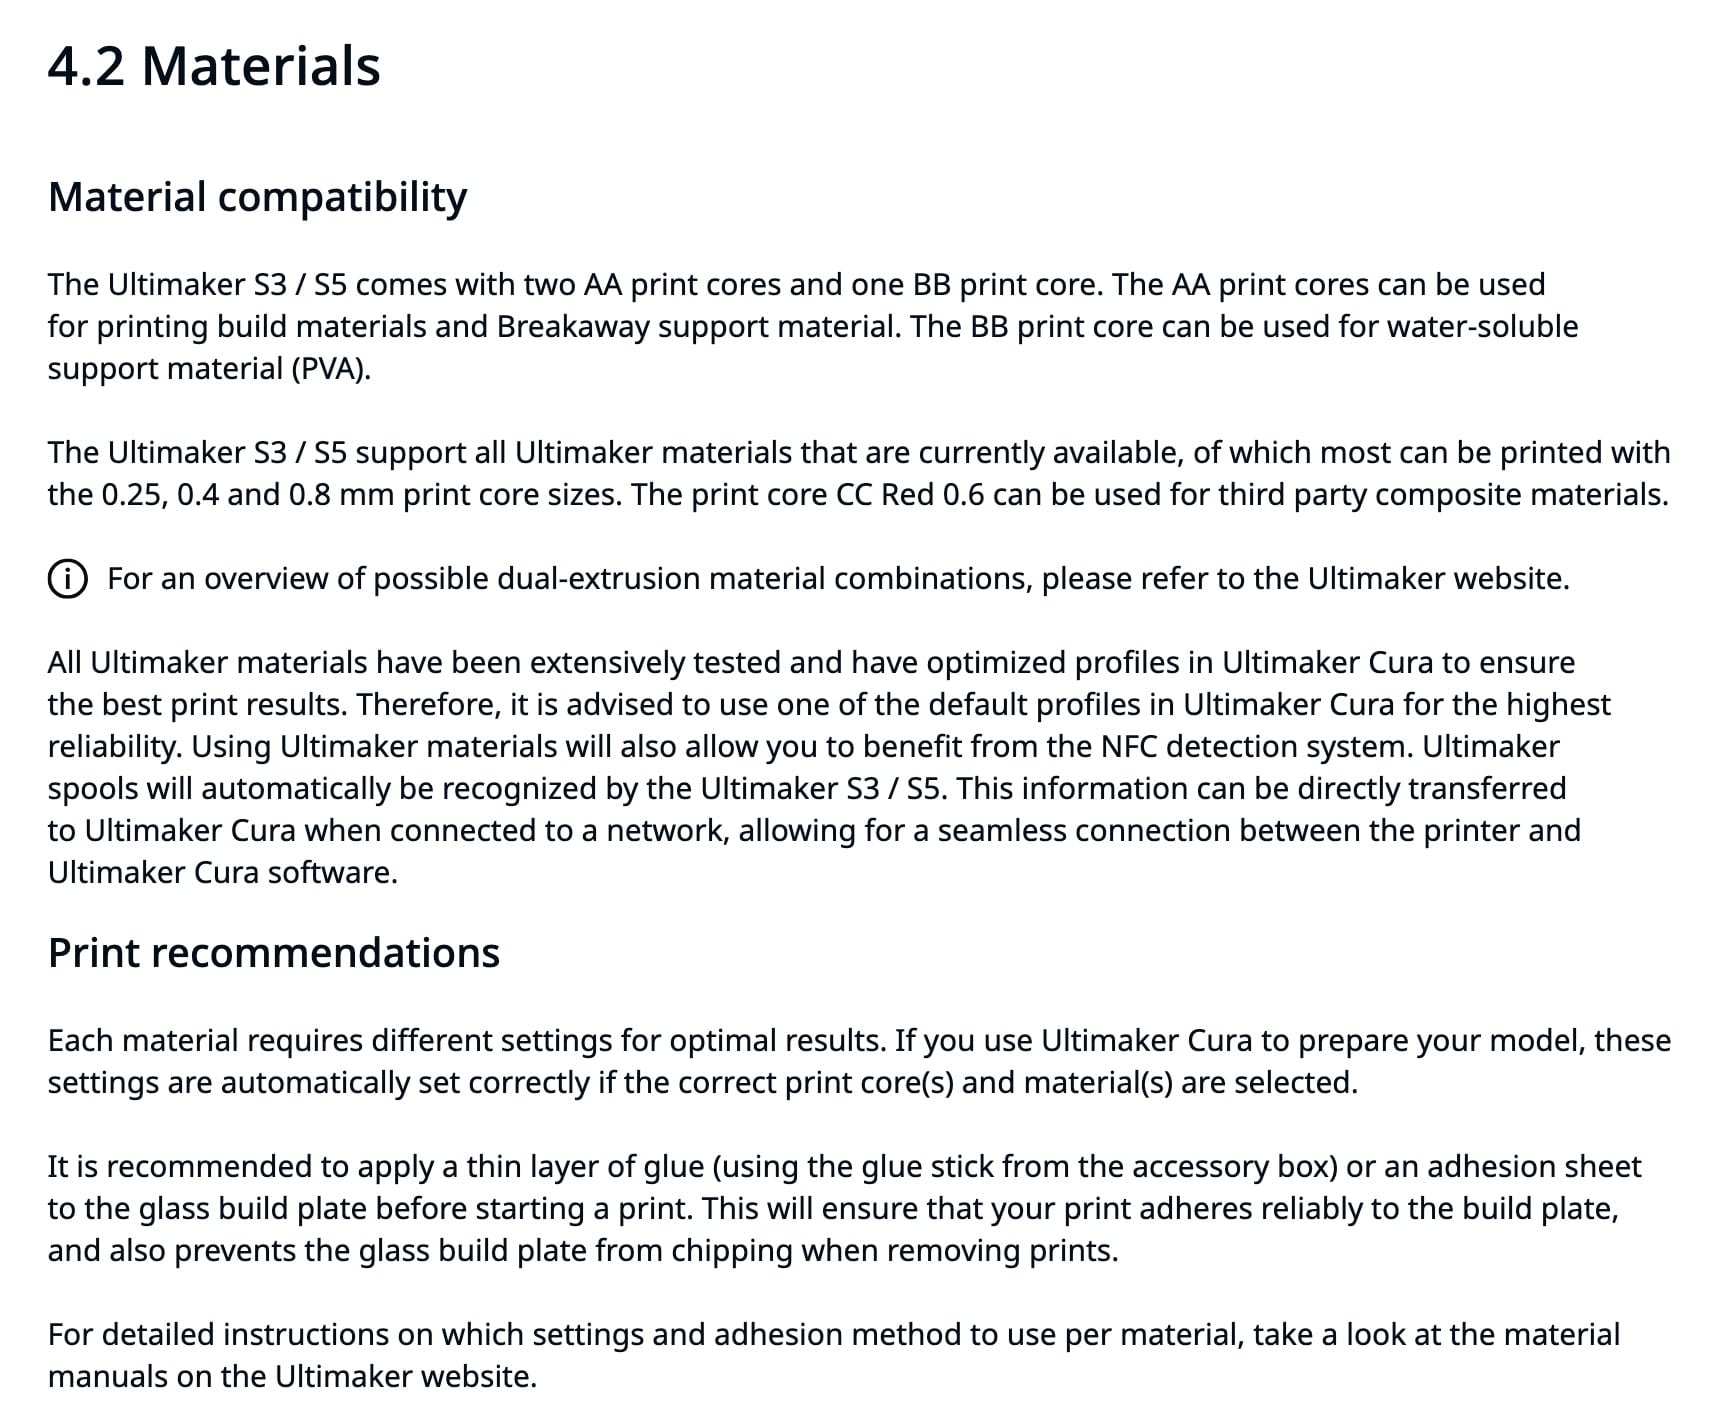
S5s are dual extruder units, with a single print head. Depending on the "cores" (Ultimaker term, generic term: "hotend"), they can print in two colors of the same build material, hold extra build material on a 2nd spool to change supplies if one spool runs out, or print supports from alternate materials that separate more easily, or dissolve in water.
More Detail
Manuals
Link to manual on Ultimaker site: available in EN - English, FI - Finnish, KR - Korean, RU - Russian, CS - Czech, FR - French, NL - Dutch, SE - Swedish, DA - Danish, HU - Hungarian, NO - Norwegian, TR - Turkish, DE - German, IT - Italian, PL - Polish, ZH-S - Chinese (simplified), ES - Spanish, JA - Japanese, PT - Portuguese, ZH-T - Chinese (traditional).
English language manual direct link (PDF)
Print Adhesion
After some peeling/warping prints, I tried using a glue stick. It left marks on the print, as matte streaks (vs the glossy finish against clean glass).
From reddit:
PLA on glass shouldn't need adhesion help. It'll turn out to be one of four things:
-
your glass isn't actually as clean as you thought
-
your bed isn't as level as you thought
-
your first layer height is a touch too high
-
your temperatures need revisiting
Also, glass does best if allowed to heat soak a bit before you start printing - it's a reasonable insulator, so takes a while for the top surface to get up to temperature when heated from the bottom. Hot PLA on cold glass doesn't stick all that well.
This person says if you can feel the glue, it's too much, and needs to be buffed:
The Ultimaker S5 glass bed can apparently be changed to a more typical steel flex plate: https://shop3duniverse.com/products/magnetic-flexible-pei-build-plate-for-ultimaker-s5
Ultimaker S5 - Zorro
RC has two Ultimaker S5 machines, this page is for Zorro specific info.
Ultimaker S5 - Luna
Needs flashing that requires partial (potentially dangerous) disassembly, or possibly new parts.
Possible documented fix: https://gr5.org/unbricking/
Qidi - Q1 Pro
Overview
Use their slicer https://github.com/QIDITECH/QIDIStudio/releases
Hostname is `mkspi` so you can access fluidd via http://mkspi , or likely http://192.168.1.211
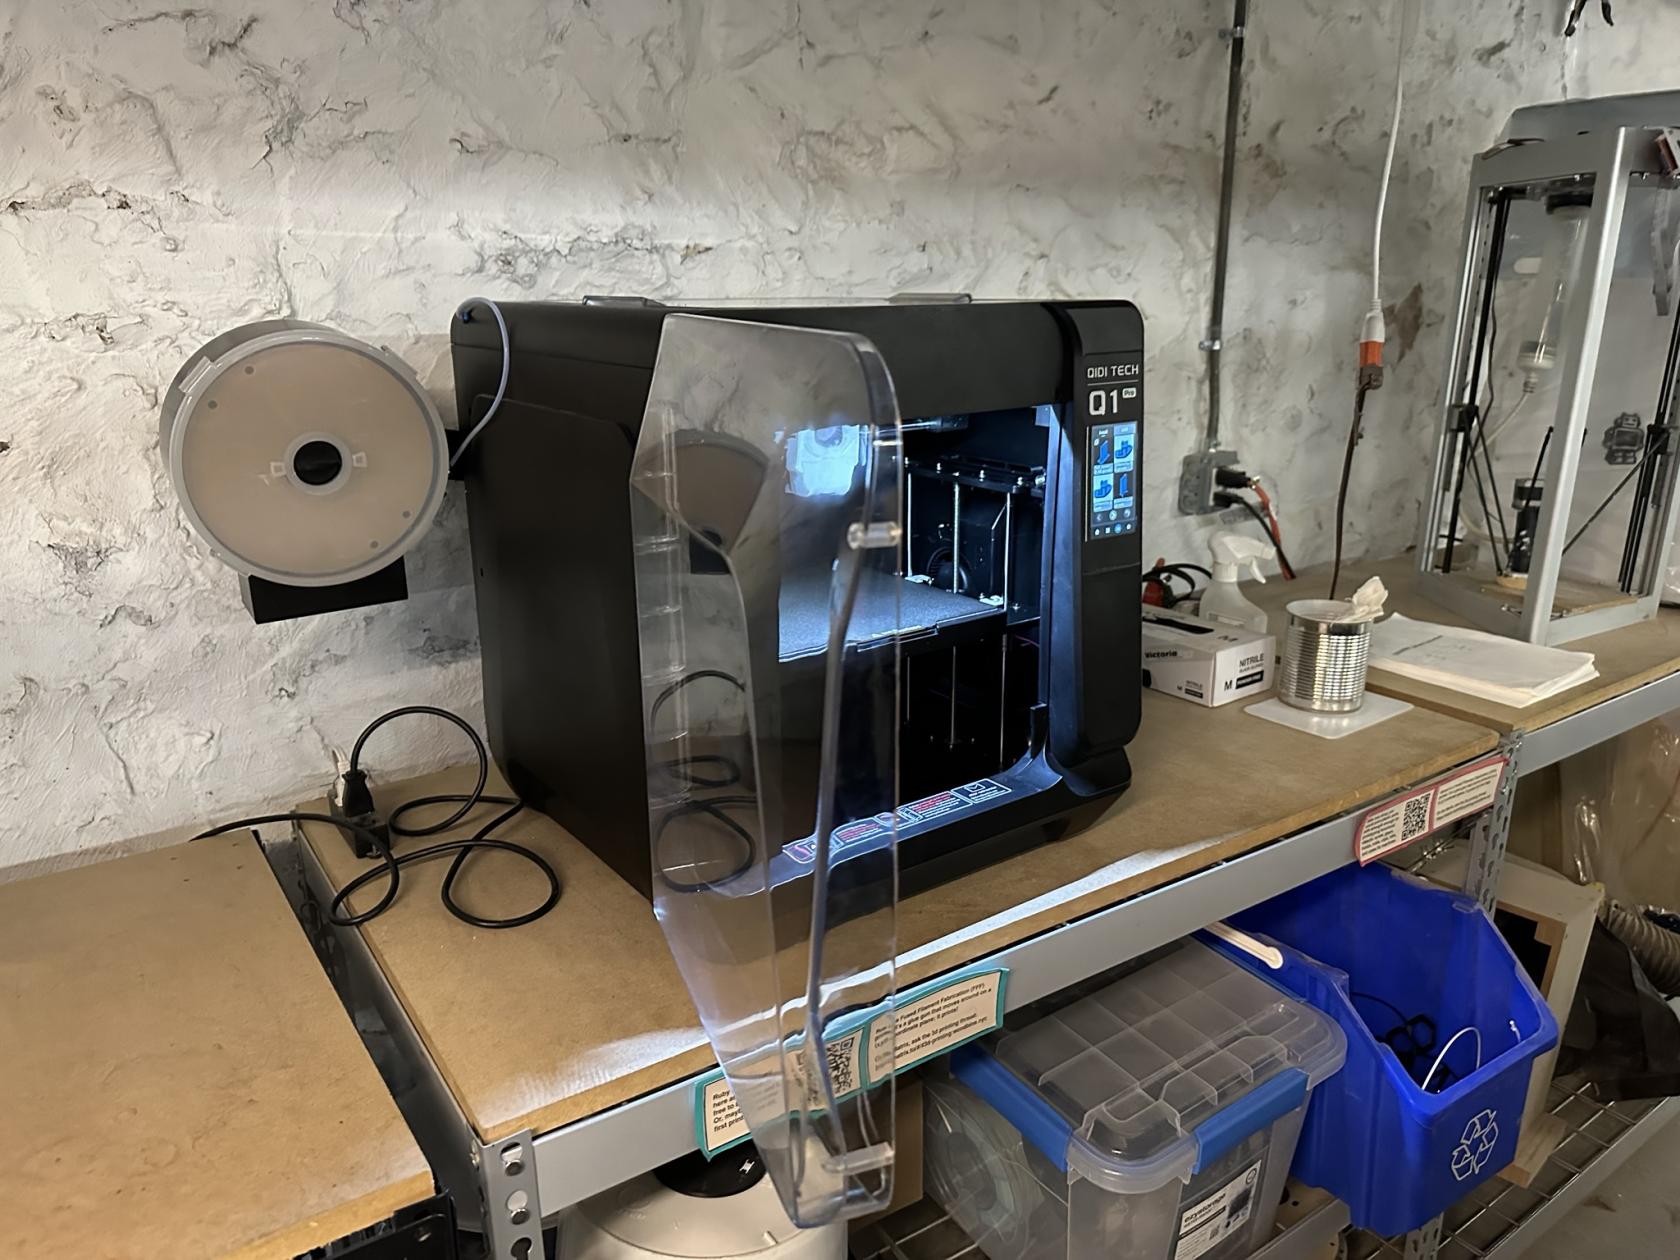
Filament Changing
Resources & Links
Repair Cafes
"Official" repair cafe site: https://www.repaircafe.nyc/
Oldest NYC repair cafe: https://www.repaircafeelbarrio.org
Weaving
LED supply
Wood supply (local)
Union shop with good small delivery and cut costs: https://glendalelumber.com/
101s
RC made reference materials explaining some basic yet complicated frequently encountered stuff like driving & dimming LEDs, impedance in audio circuits, and mic/instrument/line levels.
Impedance 101
Impedance is resistance across a path that includes capacitors and inductors.
- A capacitor blocks slow/DC signals but lets fast/high-frequency ones through
- An inductor does the opposite — it passes DC but chokes high-frequency signals
A circuit or amp output impedance and speaker's load impedance is an important relationship. When mismatched it can waste power or degrade the signal.
In an amp/speaker relationship, the ideal is to have the amp impedance much lower than the speaker impedance. This is called the damping factor.
A damping factor of 8 is good.
An amp doesn't just set the speaker in motion, it's a dynamically controlled relationship. If the amp impedance is too high, it loses that control, and the sound degrades as the speaker cone wobbles around restrained only by physical design.
- Running a 4Ω speaker on an amp rated for 8Ω minimum draws double the current. The amp runs hot, distorts, and can outright fail — either tripping protection circuits or burning output transistors. Do this long enough and you're buying a new amp.
- Going the other direction — a 16Ω speaker on an amp expecting 4Ω — won't blow anything up, but you're leaving most of your power on the table and potentially driving the amp into a region where its own distortion goes up significantly.
Multiple speakers compound this fast. Two 8Ω speakers wired in parallel present a 4Ω load. Get this wrong with a cheap amp and you'll see it thermally shut down mid-show, or worse.
Mic impedance mismatching is subtler but can be more insidious because it degrades signal before you've even amplified anything — you're corrupting the source.
The classic rule was impedance bridging: the mic preamp's input should be at least 5–10× higher impedance than the mic's output. This ensures maximum voltage transfer and doesn't load down the mic.
Dynamic mics (like an SM58) are low-impedance (~150–300Ω output) and fairly forgiving. Plug one into a high-impedance input (like a cheap guitar amp's instrument input) and you get high-frequency rolloff — the top end of the sound gets physically filtered out by the impedance mismatch acting like a passive low-pass filter.
Ribbon mics are where this becomes serious. Ribbons are extremely low impedance (sometimes under 30Ω) and the ribbon element itself is a literal strip of thin metal foil. Certain preamps — especially older ones or cheap ones — have poorly controlled input impedance that can interact badly with a ribbon. Some transformerless preamps can actually cause DC offset or reverse current conditions that physically stretch or tear the ribbon.
Phantom power (+48V) is the other major danger zone. Phantom is safe for condenser mics and most modern dynamic mics — it's balanced and equal on both signal pins. But:
- Unbalanced dynamic mics wired with certain adapters can have phantom voltage appear asymmetrically across the voice coil, potentially burning the coil out
- Vintage or cheap ribbon mics (without proper transformers) can have phantom voltage surge through the ribbon and vaporize it instantly
- Improperly wired cables with phantom enabled can send voltage somewhere it shouldn't go — into a preamp output, into a DI box's unprotected input, etc.
LEDs 101
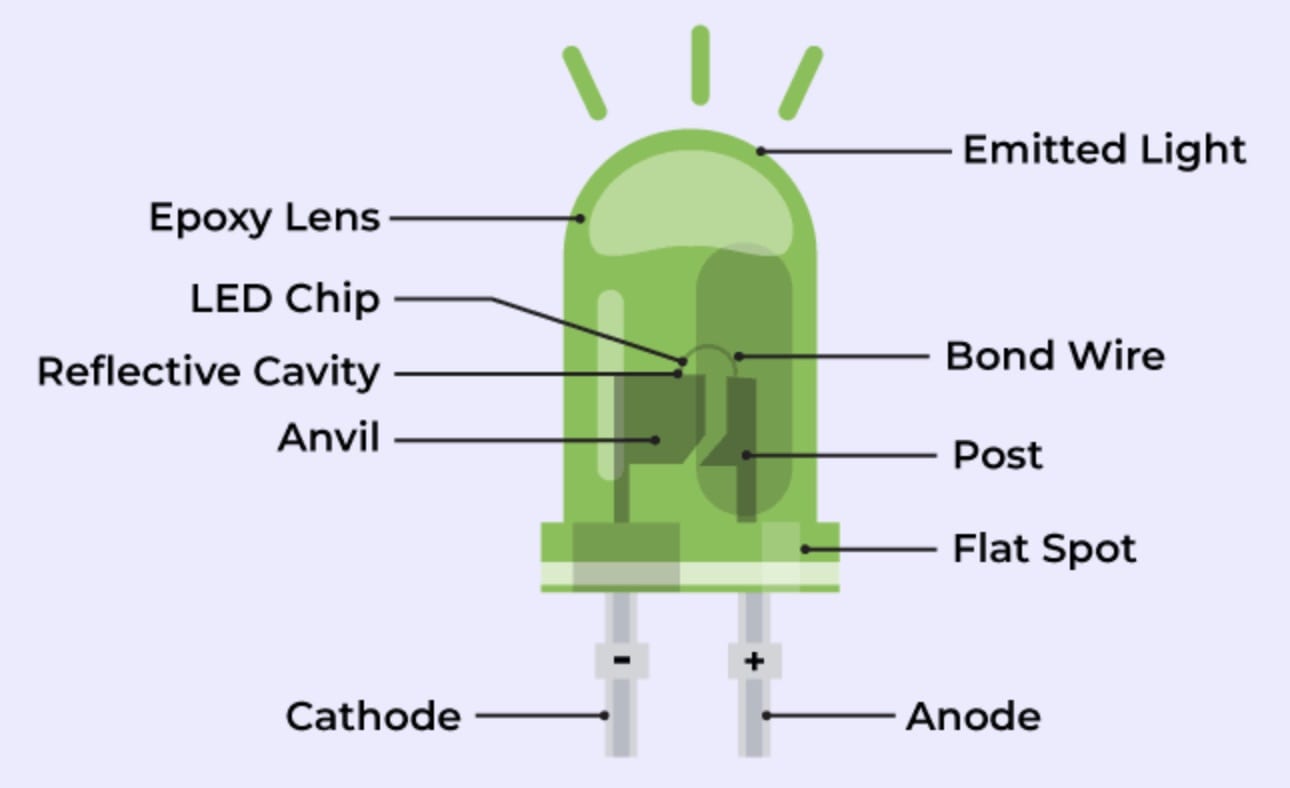
The anode wire extends into the epoxy/plastic housing of the LED and has small cup which houses a tiny semiconductor. a ~25µm diameter gold or aluminum "bond wire" bridges the semiconductor to the cathode pin.
The semiconductor in the cup of the anode creates the light, and is a "forward-biased p-n junction." This is just a way of describing the mechanism. At a certain voltage (~1.8–3.5V) the p-n junction is activated, releasing light. Brightness is proportional to current, and the forward voltage is a consequence of that current.
The behavior of an LED can be described using the Shockley diode equation. The important part to note is that this equation describes an exponential relationship, such that a tiny voltage increase can cause an exponential increase in current, making it impractical to control an LED via voltage.
So... LEDs are all fundamentally current-controlled devices.
Types of LEDs
High-power LEDs
Typically have associated datasheets that specify a drive current, and the forward voltage is listed as a result, with tolerances. Running these from a fixed voltage is risky, with small Vf variations between chips of the same model, or changes with temperature, translate directly into wildly different currents. These essentially require a CC (Constant current) driver.
Low-power LEDs
Typically run with a series resistor from a fixed voltage rail. The resistor functions as a crude current control.
Addressable LEDs
Have a CC driver integrated, to control current to each color channel. So from the outside they function as constant voltage design.
Strips and arrays
Strips and arrays also typically have resistors integrated, so again can be treated as constant voltage devices, though at the component level are still constant current.
Strips in detail (from https://www.ledsupply.com/blog/ultimate-guide-on-buying-led-strip-lights/)
DC flex strips
Simple. Supply 12-24V, the built-in resistors on the strip do the current limiting.
Can be dimmed with PWM.
Downsides:
- Resistors generate heat rather than light.
- Over long runs, end of strip can be visibly less bright. 24V strips can run longer, but same eventual result. This can be mitigated by powering from both ends, making sure power supply wire gauge is ample.
AC strips
Have miniature switching converters that rectify and regulate DC voltage. These are more limited in terms of cutting to length than DC strips.
Requires specifically matched leading or trailing edge triac dimmer.
Dimming
The most common LED dimming method is Pulse Width Modulation (PWM). A pulse wave is similar to a square wave, but has more variation. A square wave is defined is 50% low, 50% high. A pulse wave can be high/low in any proportion.
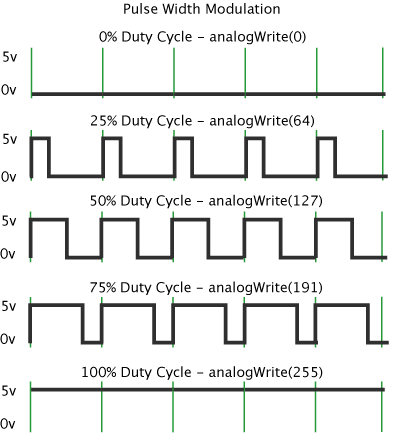
(from https://docs.arduino.cc/learn/microcontrollers/analog-output/)
An LED being controlled by a pulse wave at a high enough frequency exploits limitations in human perception, and appears to at 50% brightness, when in fact it is on a full brightness, but just 50% of the time. The cutoff for perception is around 50-60Hz. In cheaper or poorly designed PWM controls, the frequency of the on/off cycle is lower, e.g. 100Hz, which may not be obvious to the eye, but can leave people with headaches or become tiring. Better PWM controls cycle upwards of 1kHz.
References:
https://www.ledsupply.com/blog/understanding-led-drivers/
https://www.ledsupply.com/blog/dimming-leds-guide-how-to-tell-if-your-lights-are-dimmable/
mic-instrument-line levels 101
Mic level is the weakest. A microphone's output is tiny — we're talking millivolts. It's a fragile, low-amplitude signal that needs significant amplification before it's useful. This is what preamps exist to do — take mic level up to line level. The signal is also unbalanced in many cheaper implementations, making it susceptible to noise pickup over any meaningful cable length, which is why professional mics use balanced XLR connections.
Instrument level sits between mic and line, but it's a weird in-between that causes a lot of confusion. An electric guitar or bass puts out more voltage than a mic, but it's also very high impedance — typically 10kΩ to 1MΩ depending on the pickups. That high impedance means the signal is very sensitive to the input it connects to. Plug a guitar into a low-impedance input and the input loads down the pickups, sucking out high frequencies and killing the characteristic tone. This is why guitar amps and DI boxes have high-impedance instrument inputs — they're not just amplifying the signal, they're presenting the right impedance to let the pickup behave correctly.
Line level is the standard operating level for most audio gear — mixers, interfaces, effects processors, CD players, synthesizers. There are actually two standards: consumer line level at around −10dBV (used in home stereos, consumer gear) and professional line level at +4dBu (used in studios and live sound). These are about 12dB apart, which is roughly 4× the voltage. Plugging pro gear output into consumer gear input can clip it. Plugging consumer output into pro gear input means it arrives quieter than expected and you're amplifying more noise floor along with it.
Mic into a line input — the signal arrives way too quiet. You crank the gain to compensate, and now you're amplifying all the noise the cable and input stage picked up along the way. You get a usable signal buried in hiss.
Line into a mic input — the signal is massively too hot. It slams the preamp into hard clipping immediately. Sounds terrible, and depending on the preamp, sustained high levels can damage it.
Guitar into a line input — two problems at once. The level is wrong (instrument level is lower than line), and the impedance is wrong (line inputs are low impedance, which loads the pickups). You get a quiet, thin, tonally incorrect signal. This is why "just plug it into the interface's line input" doesn't work — you need the instrument/Hi-Z input.
Guitar into a mic input — impedance is still wrong, and now you're also dealing with a preamp designed for balanced low-impedance sources trying to handle an unbalanced high-impedance one. Noise, tone loss, and potential level issues all at once.
Synth or keyboard into an instrument input — a synth outputs true line level from a low-impedance output. Plugging it into a Hi-Z instrument input usually works okay but you're not getting the right impedance match, and on some interfaces it can sound slightly different than going into a proper line input.
Inkle Loom Basics
The Inkle loom is a relatively simple loom best-suited for weaving longer narrow pieces, but uses concepts that are built on by more complex looms. It's also really easy to make.
Screenshots taken from: https://www.youtube.com/watch?v=PhzBMYzPVW0
Useful for weaving reference: https://www.youtube.com/watch?v=8nYpfku1Yjw
There are tons of other videos and tutorials...
Pegs by placement (+ tension peg)
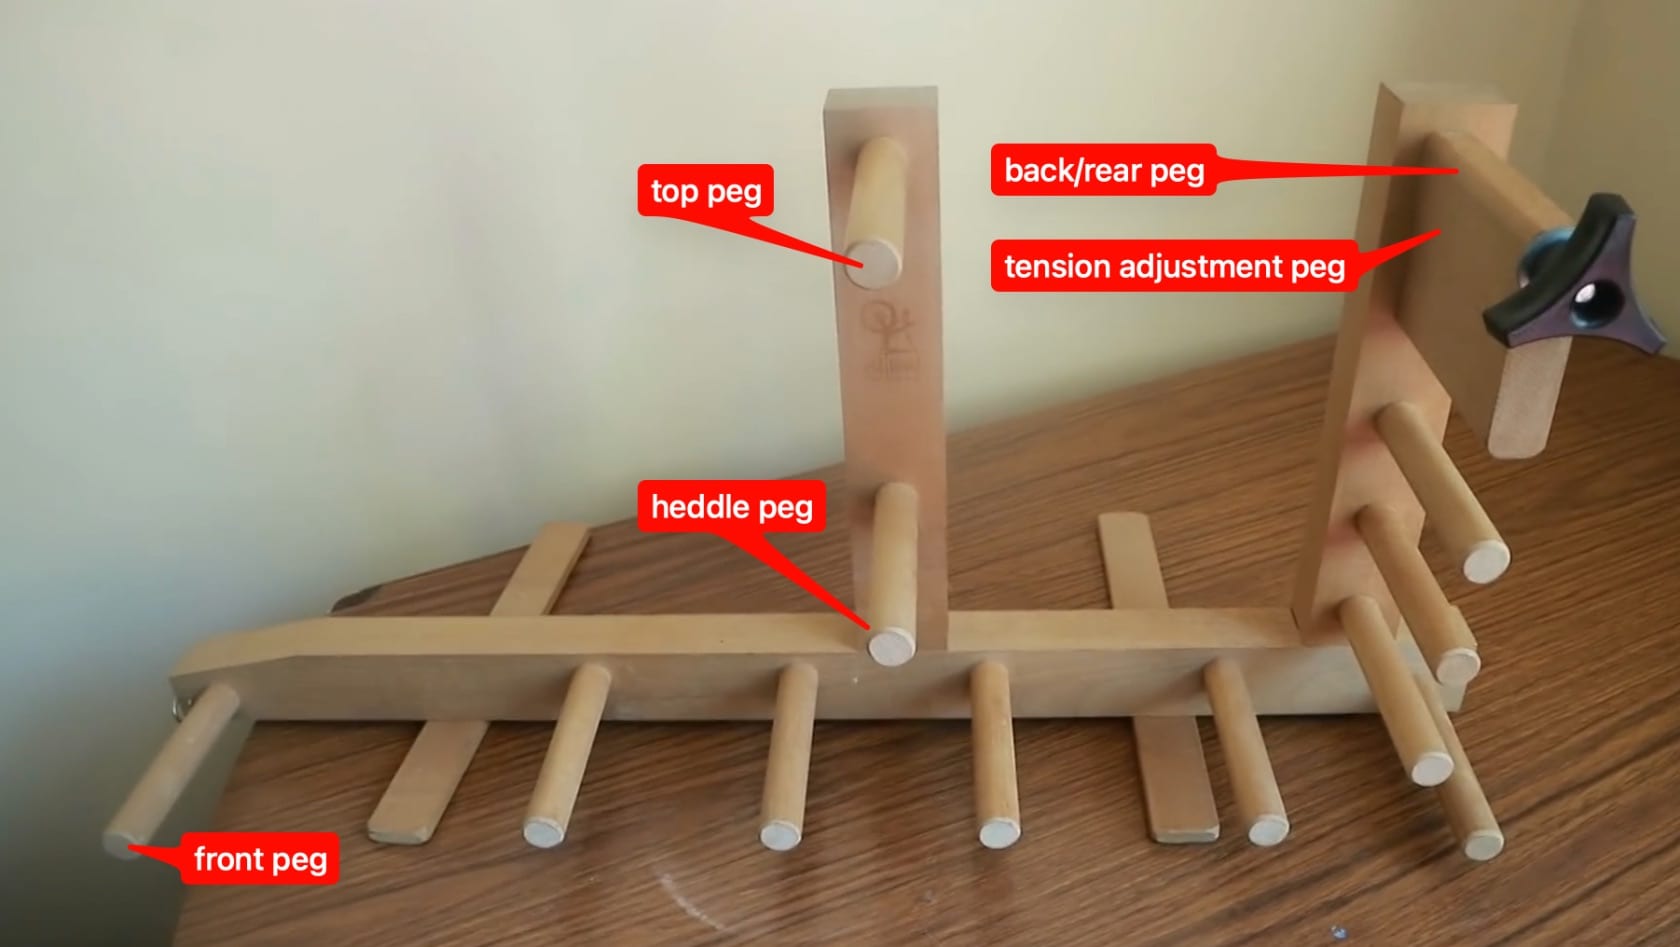
Pegs can be referred to by placement on machine. In this case the rear peg also serves as a tension peg. Tension can be adjusted in different ways. In this case, the rear peg shape functions as a crude cam (wikipedia), which increases tension by rotation, and is locked into place via pressure applied via the black knob.
In the most minimal form, a loom could consist of only 4 pegs. The additional pegs allow for taking up additional warp threads, allowing for longer pieces to made on a small loom, and also allow for specific placement of active weaving area, which has consequences for the quality of the final work.
Pegs by function
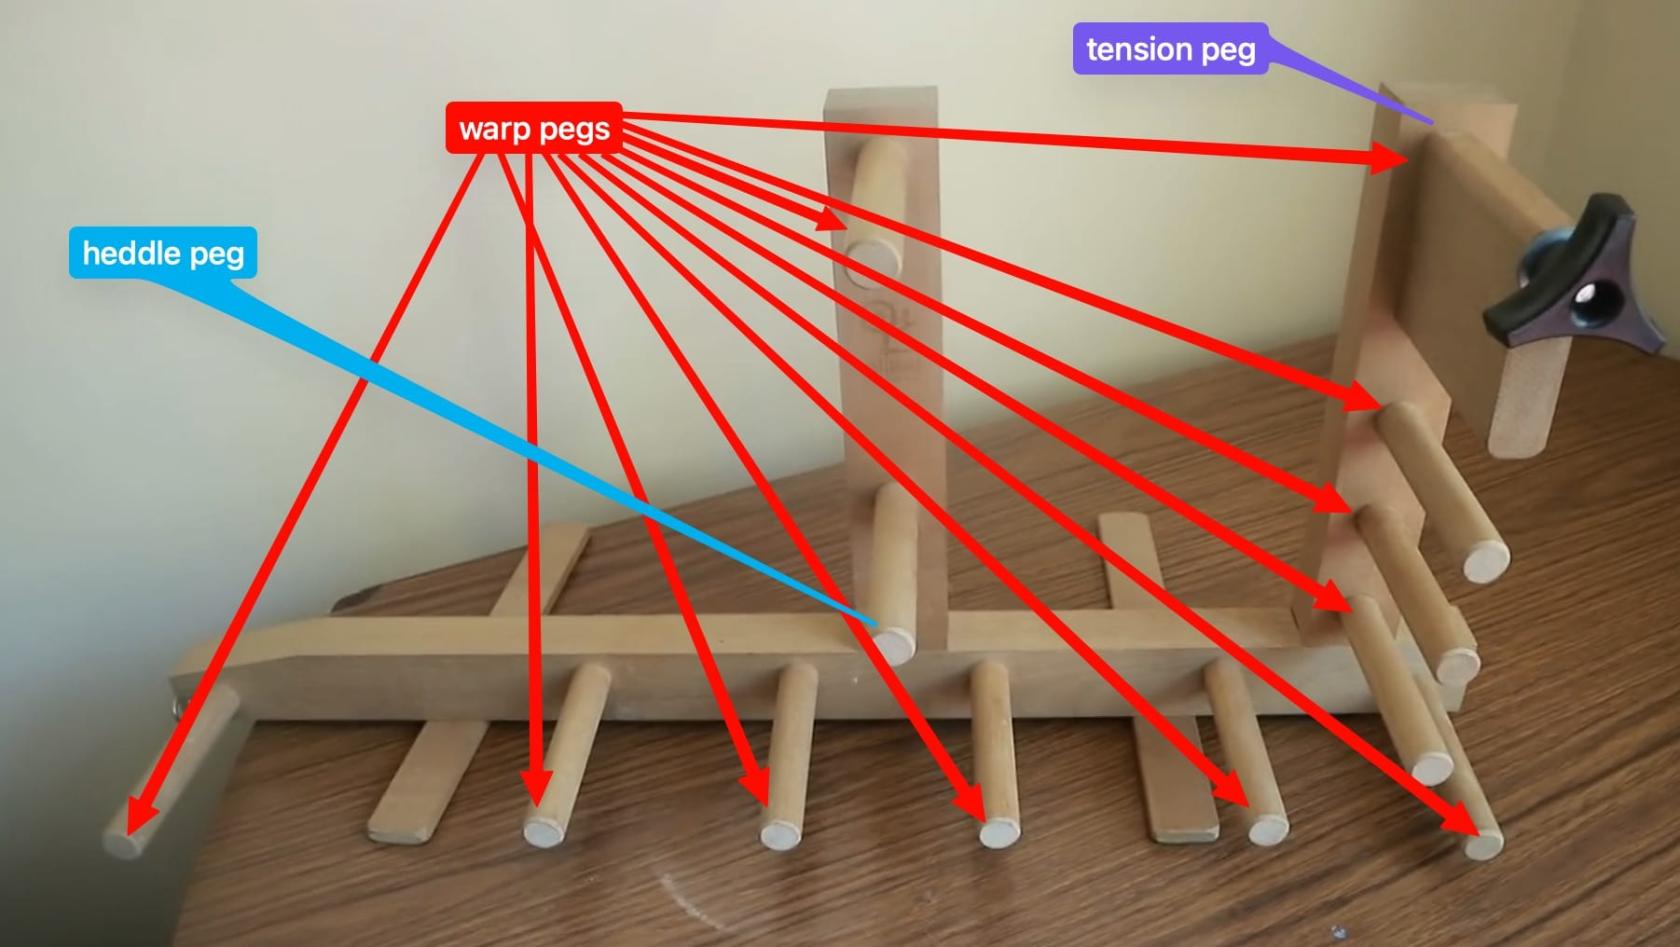
Pegs can also be referred to by their function. Warp pegs provide a wrapping path for the warp threads, while the heddle peg provides an anchor for heddle loops. The tension peg will by definition always be a warp peg, as it serves to provide tension to the warp threads.
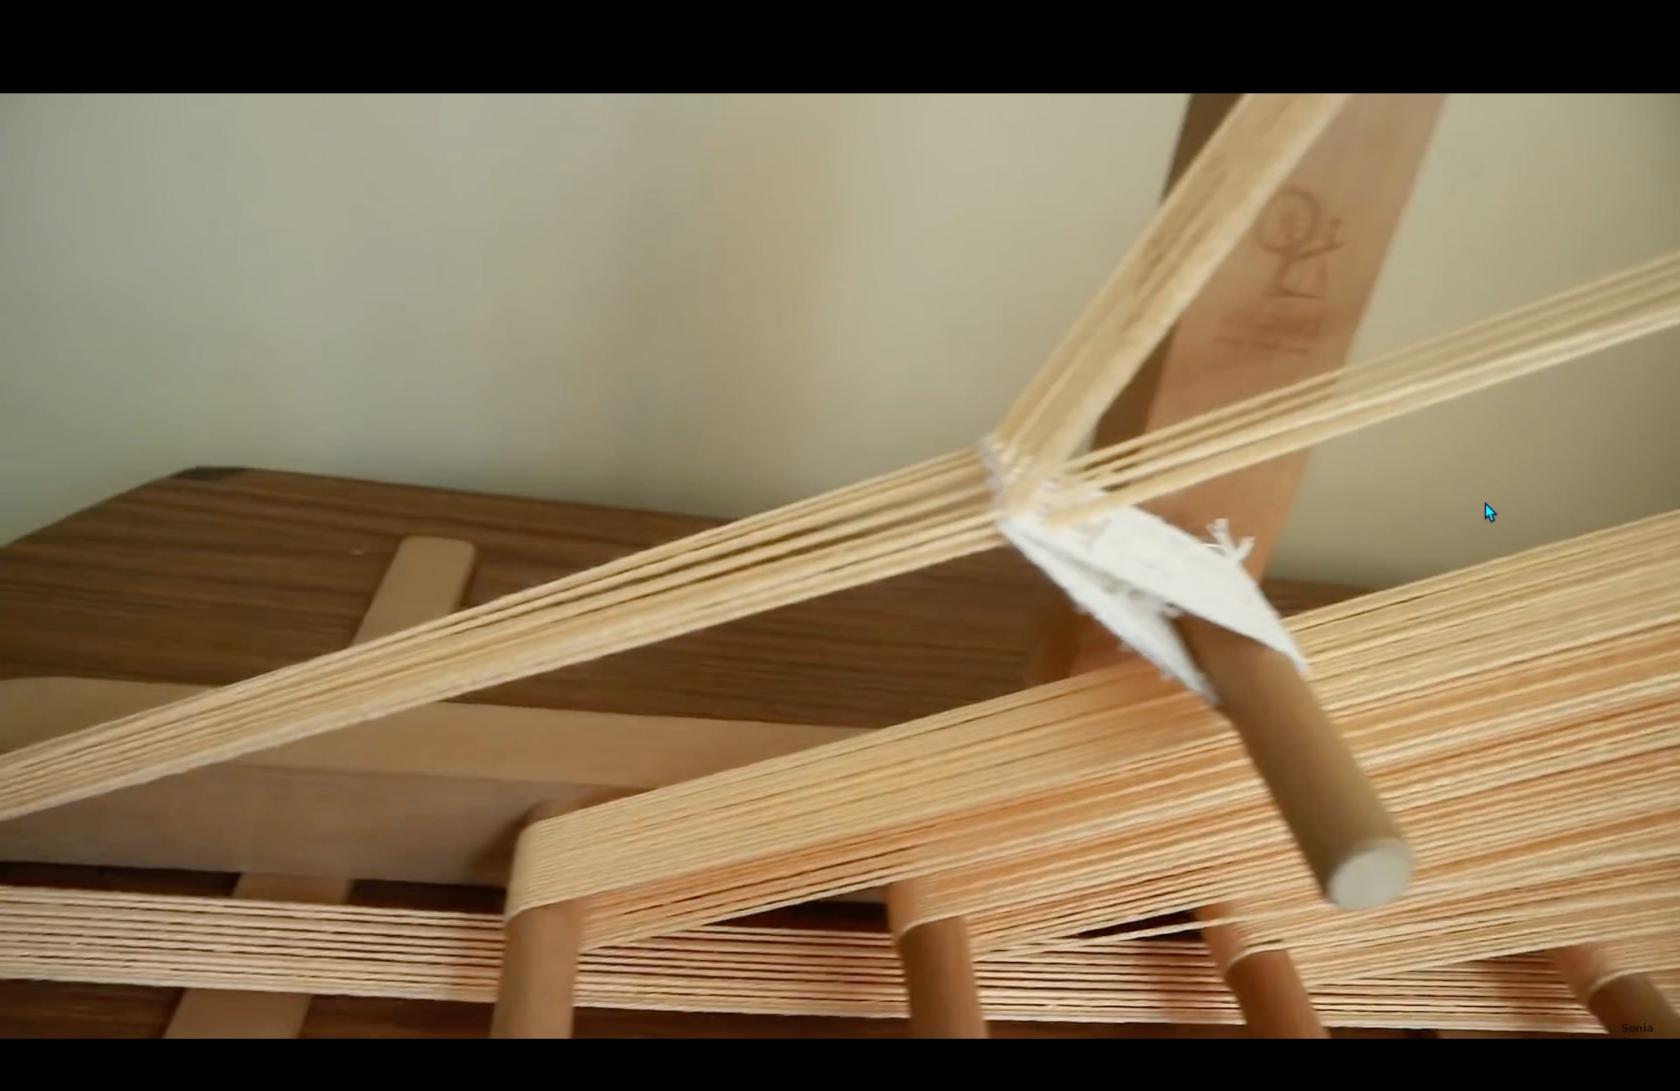
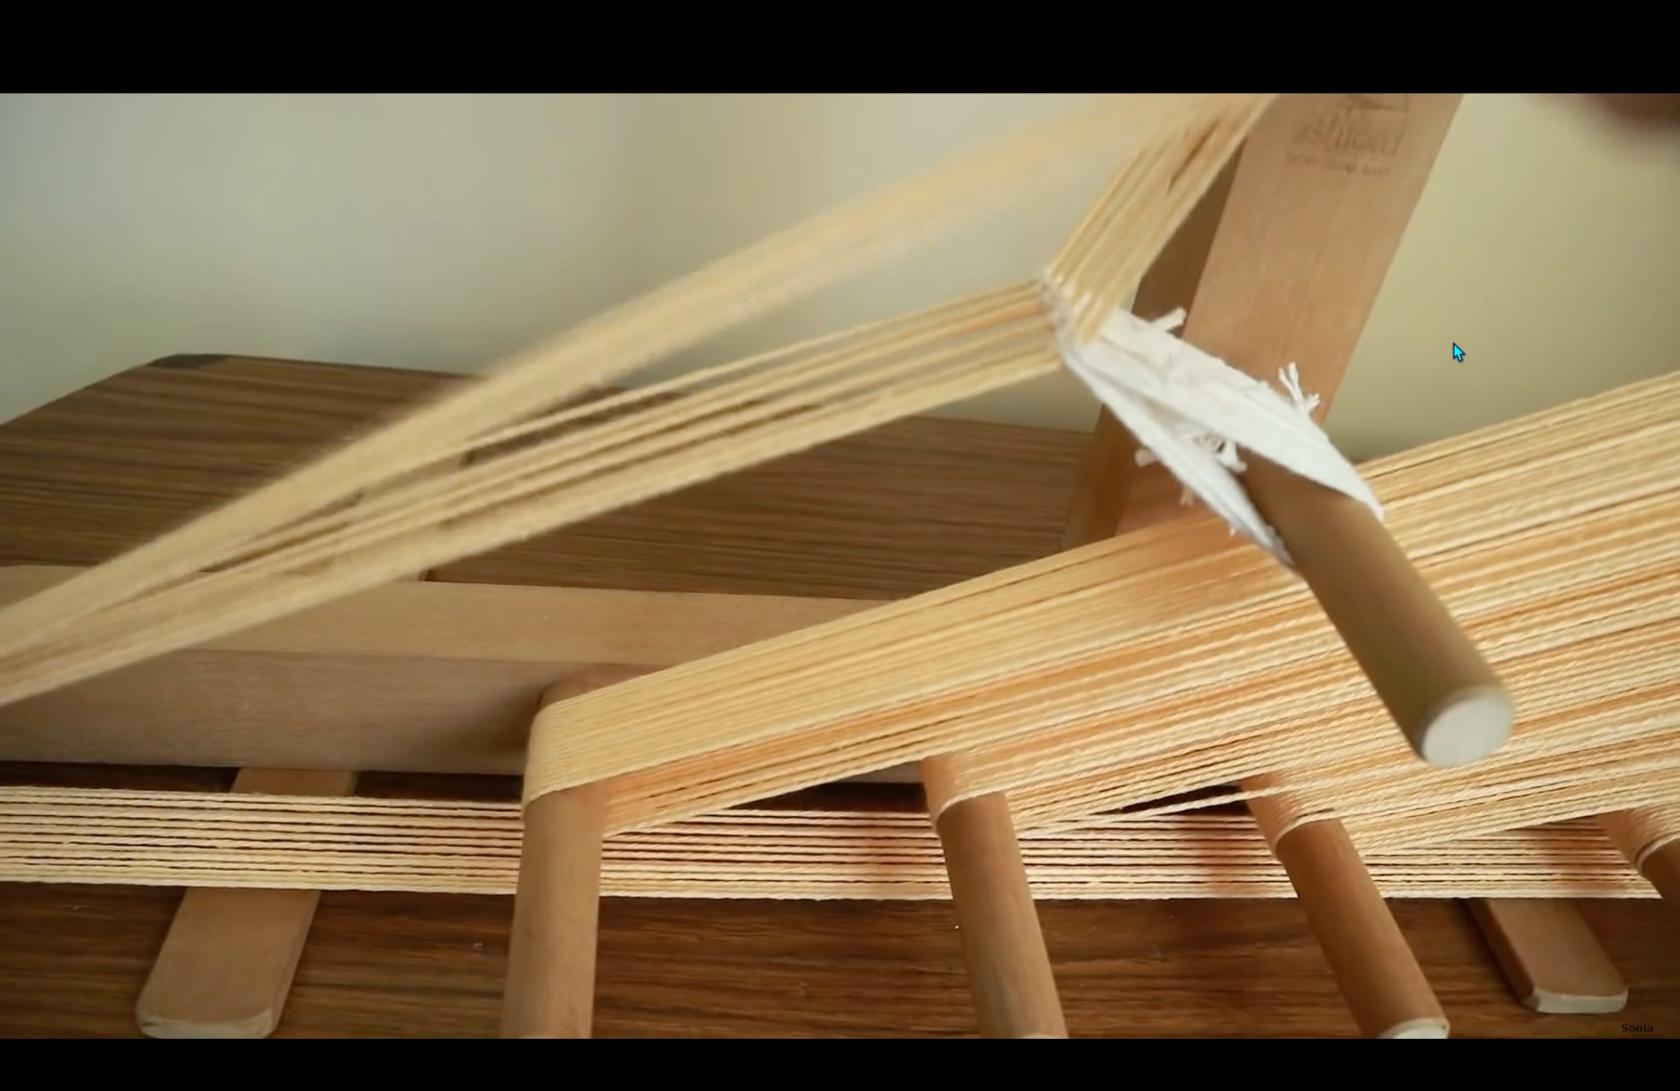
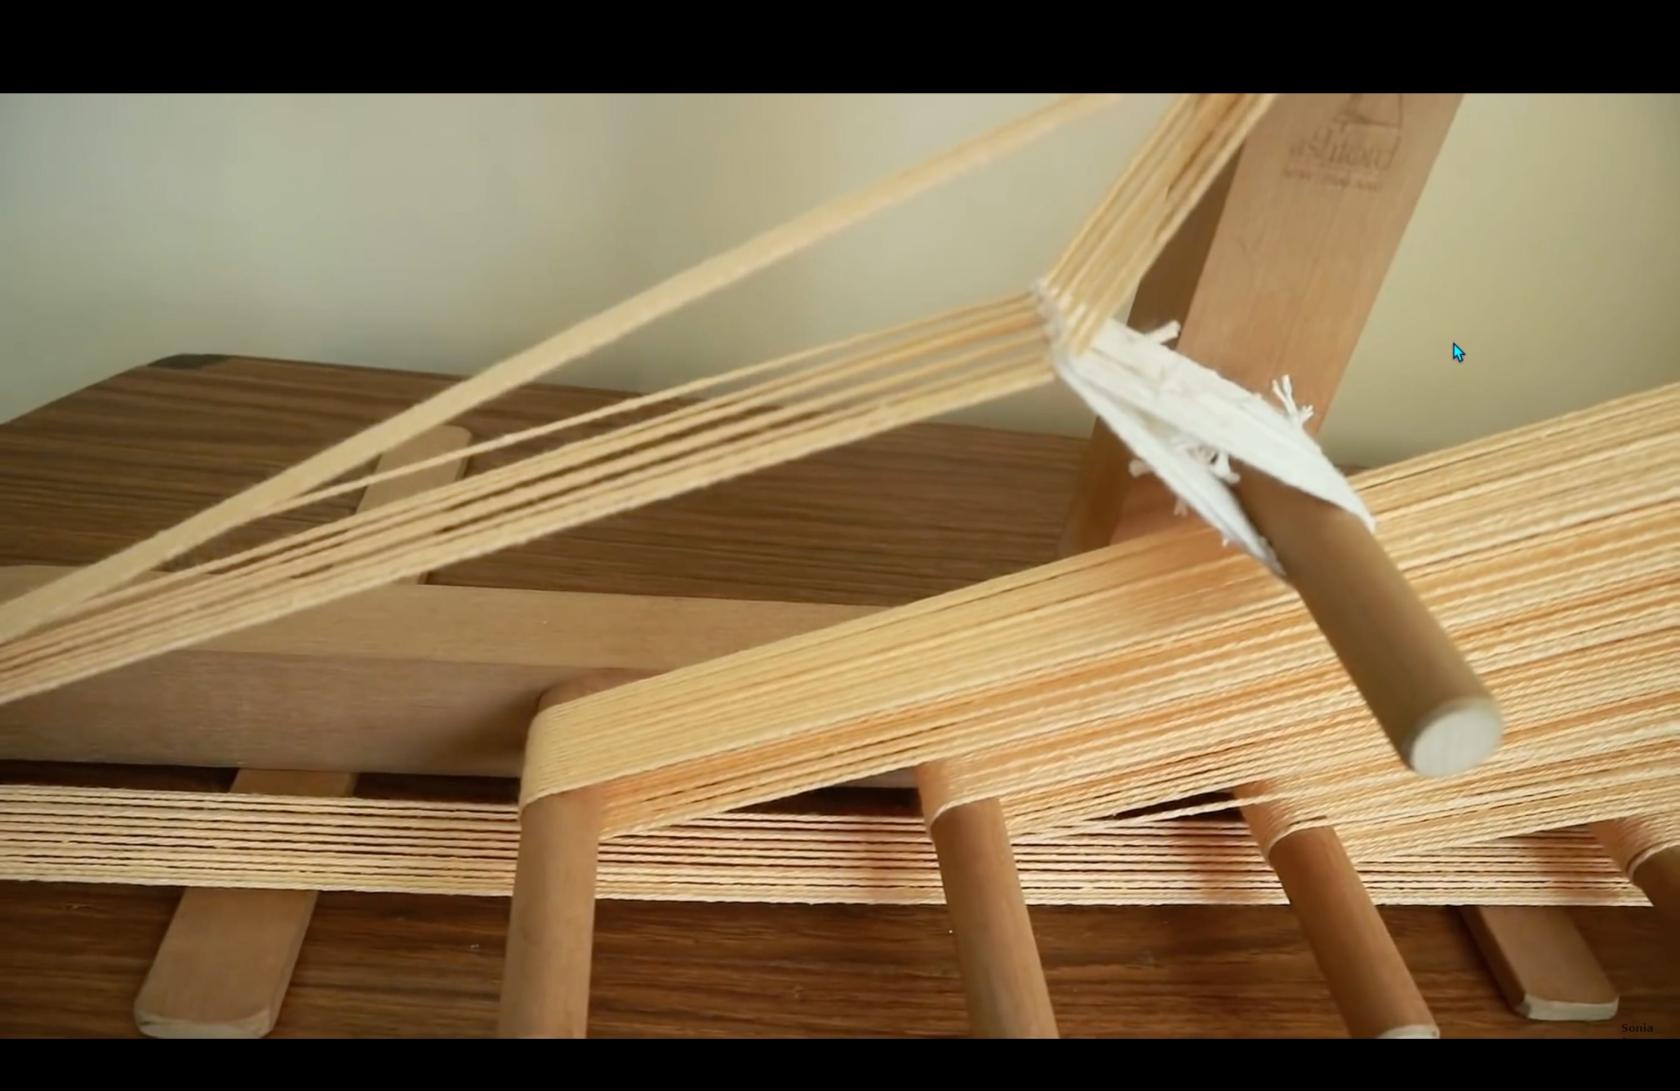
The heddles
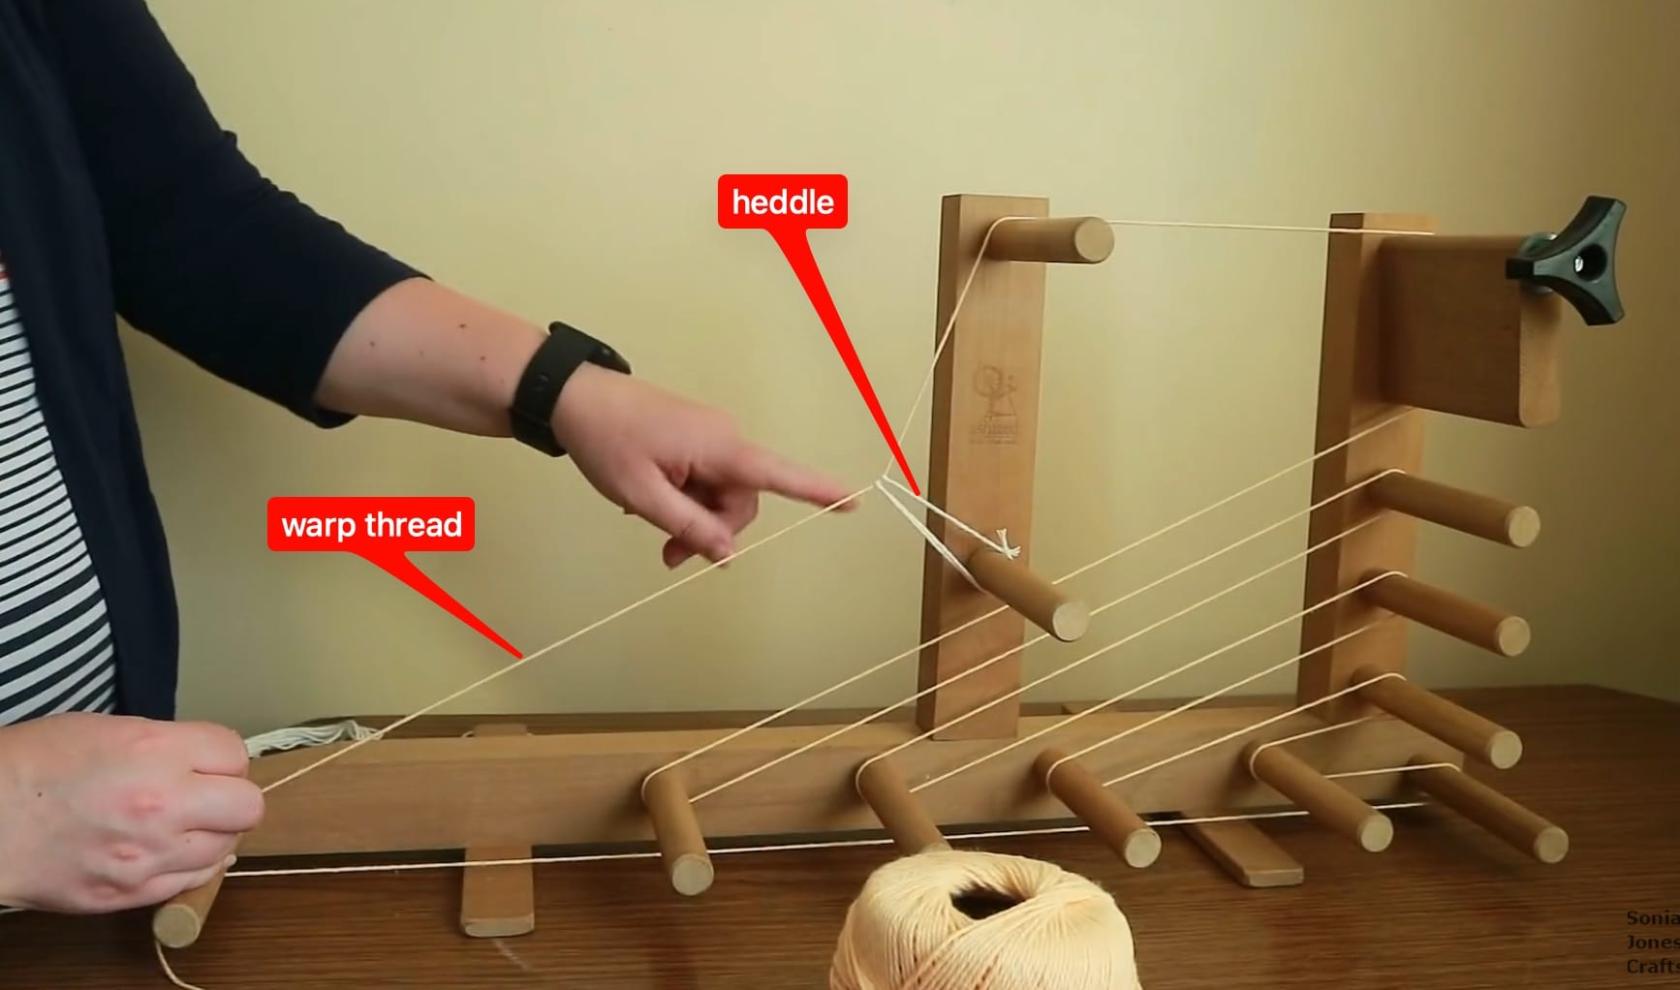
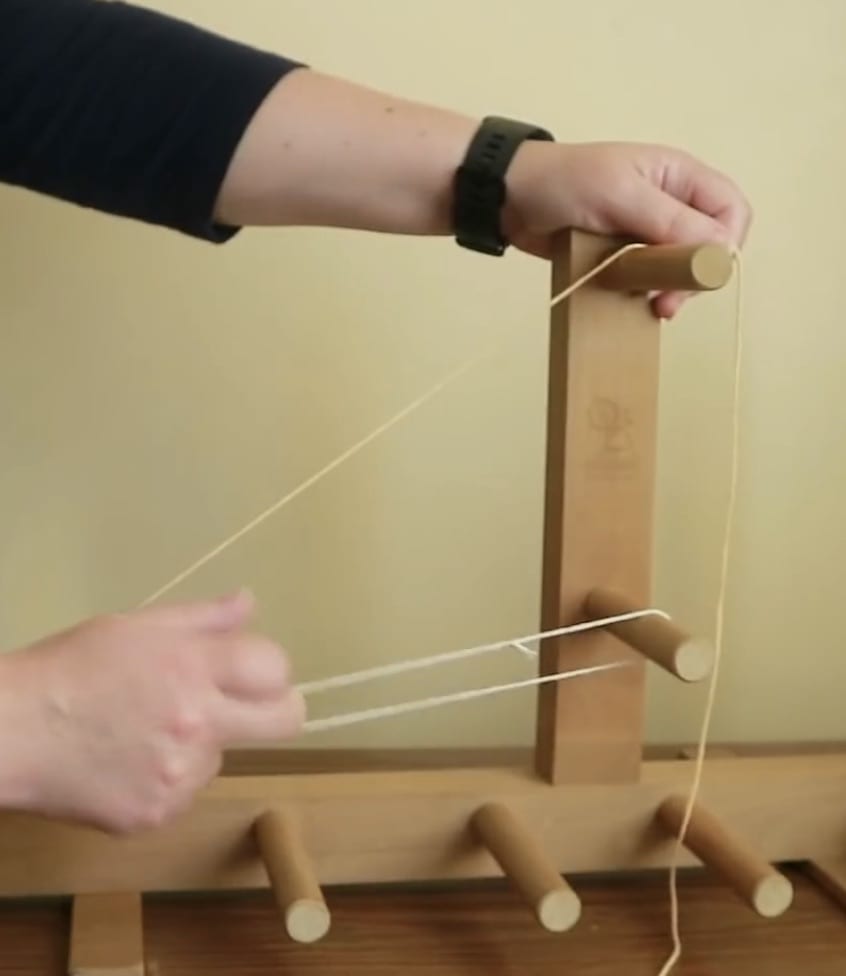
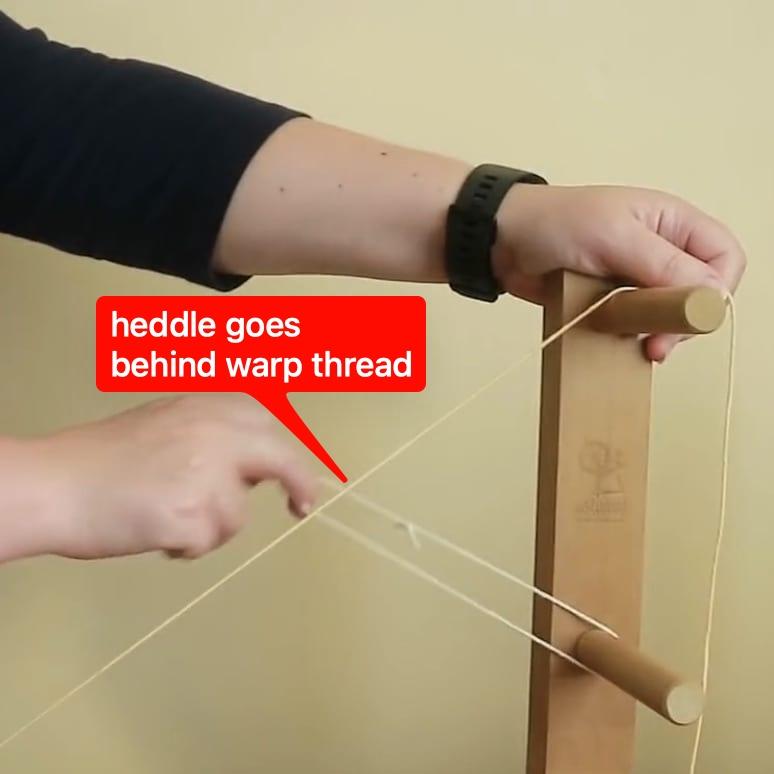
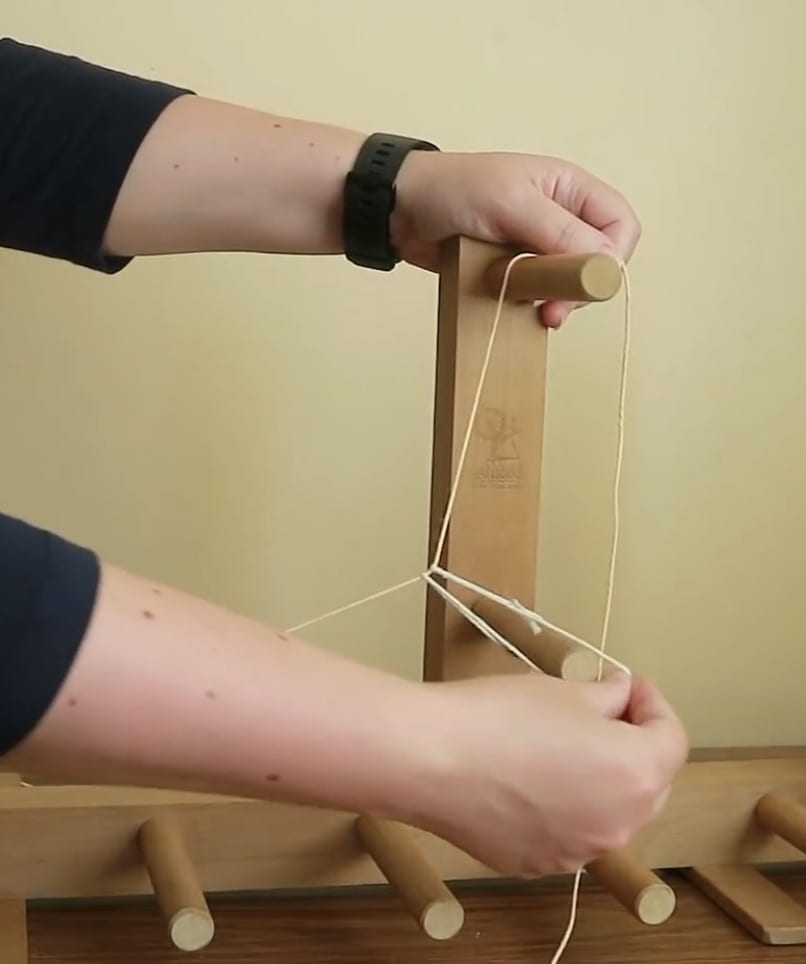
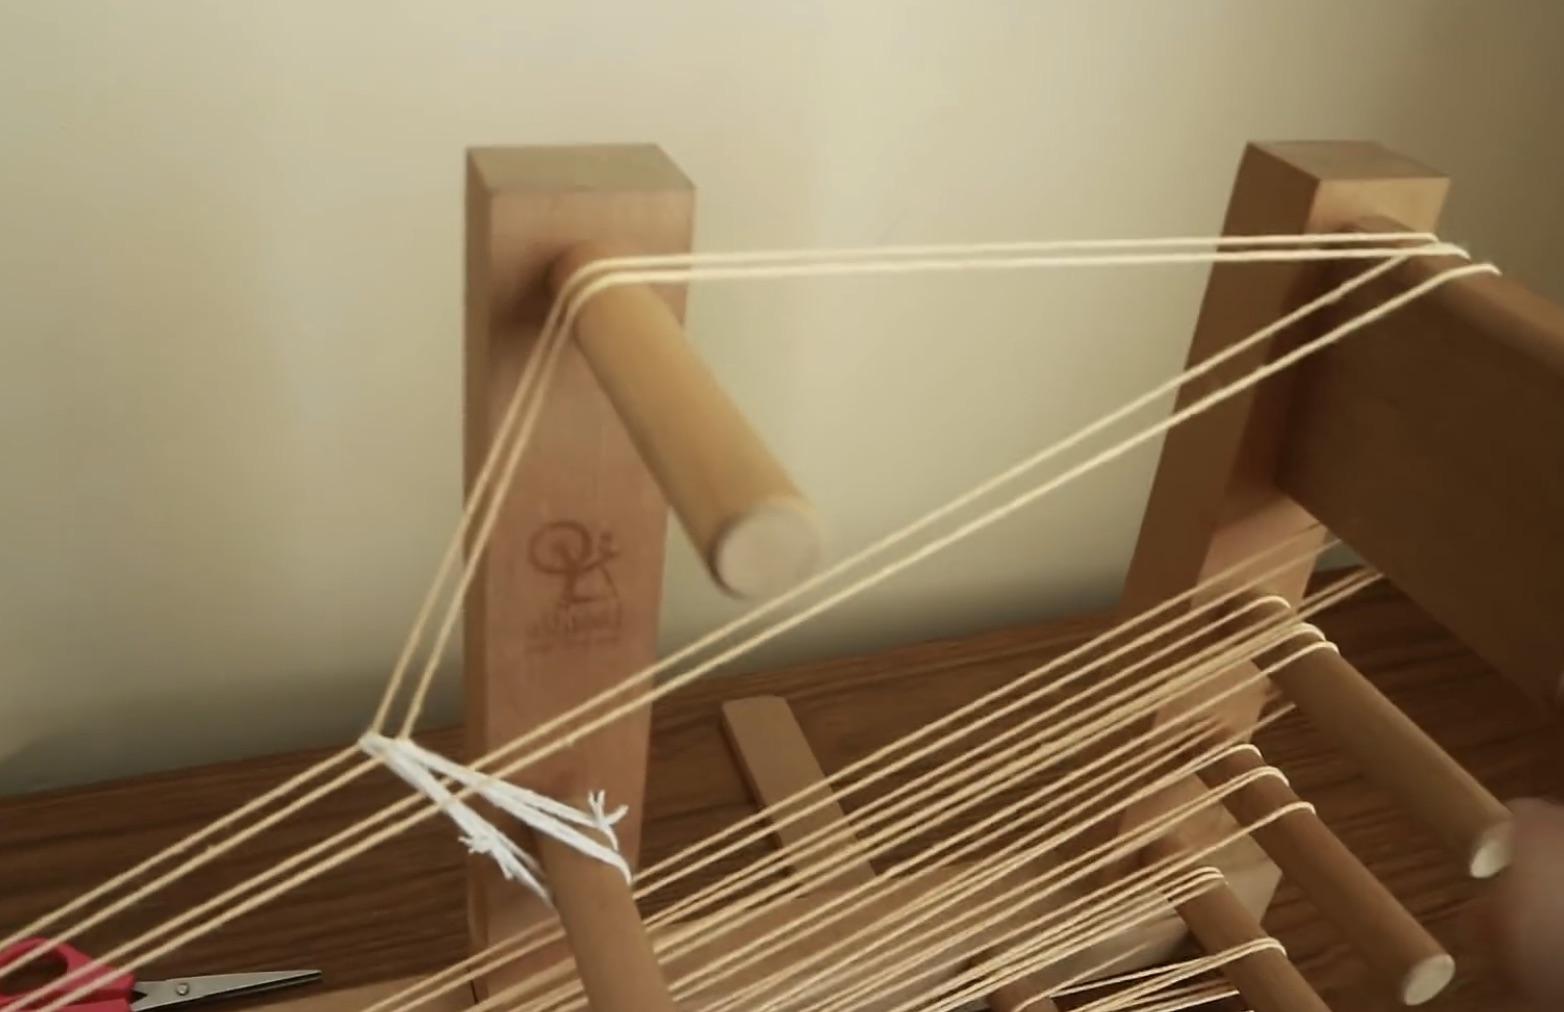
The heddle peg is the anchor for the heddles. Heddles are loops of thread that wrap around warp threads, apply tension, and most critically, change the path of some warp threads.
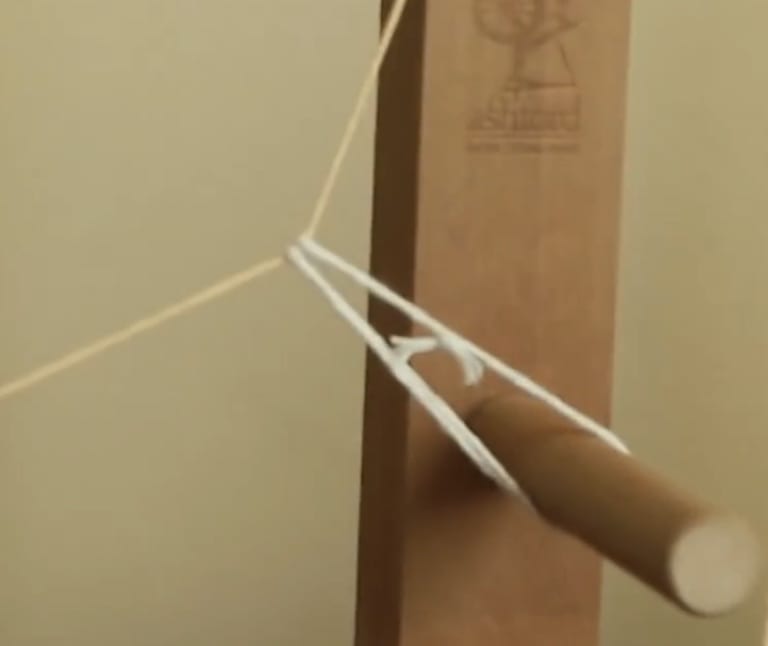
On an Inkle loom, heddles are simple loops of cord.
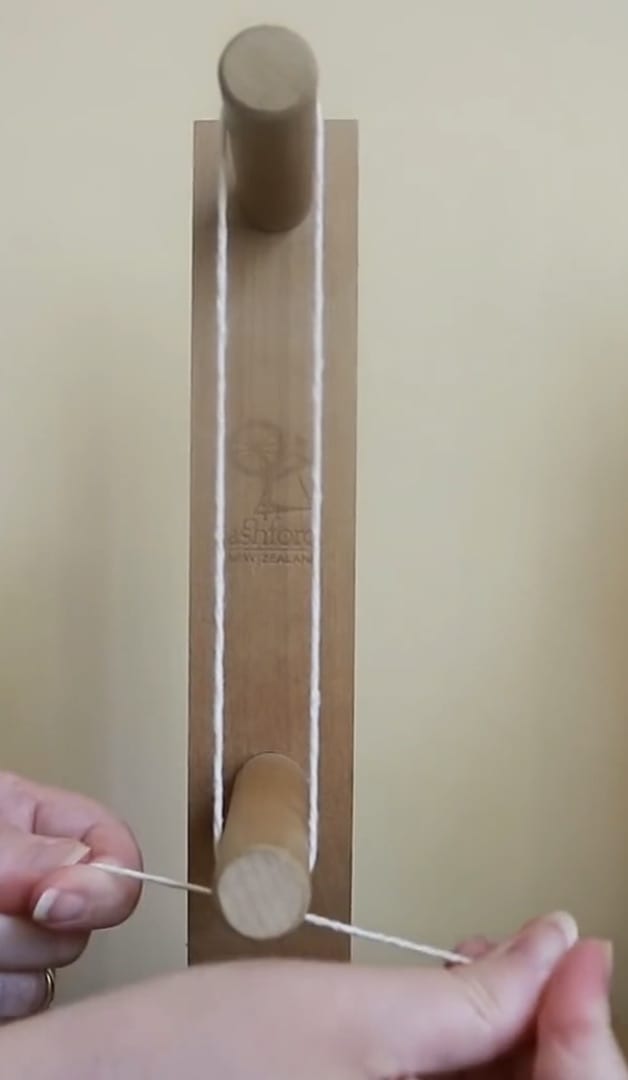
| Sizing a single heddle by tying a loop around top peg and heddle peg. | Extending the heddle from the heddle peg. | Wrapping heddle around wrap thread. | Securing heddle to heddle peg after wrapping. |
 |
 |
 |
 |
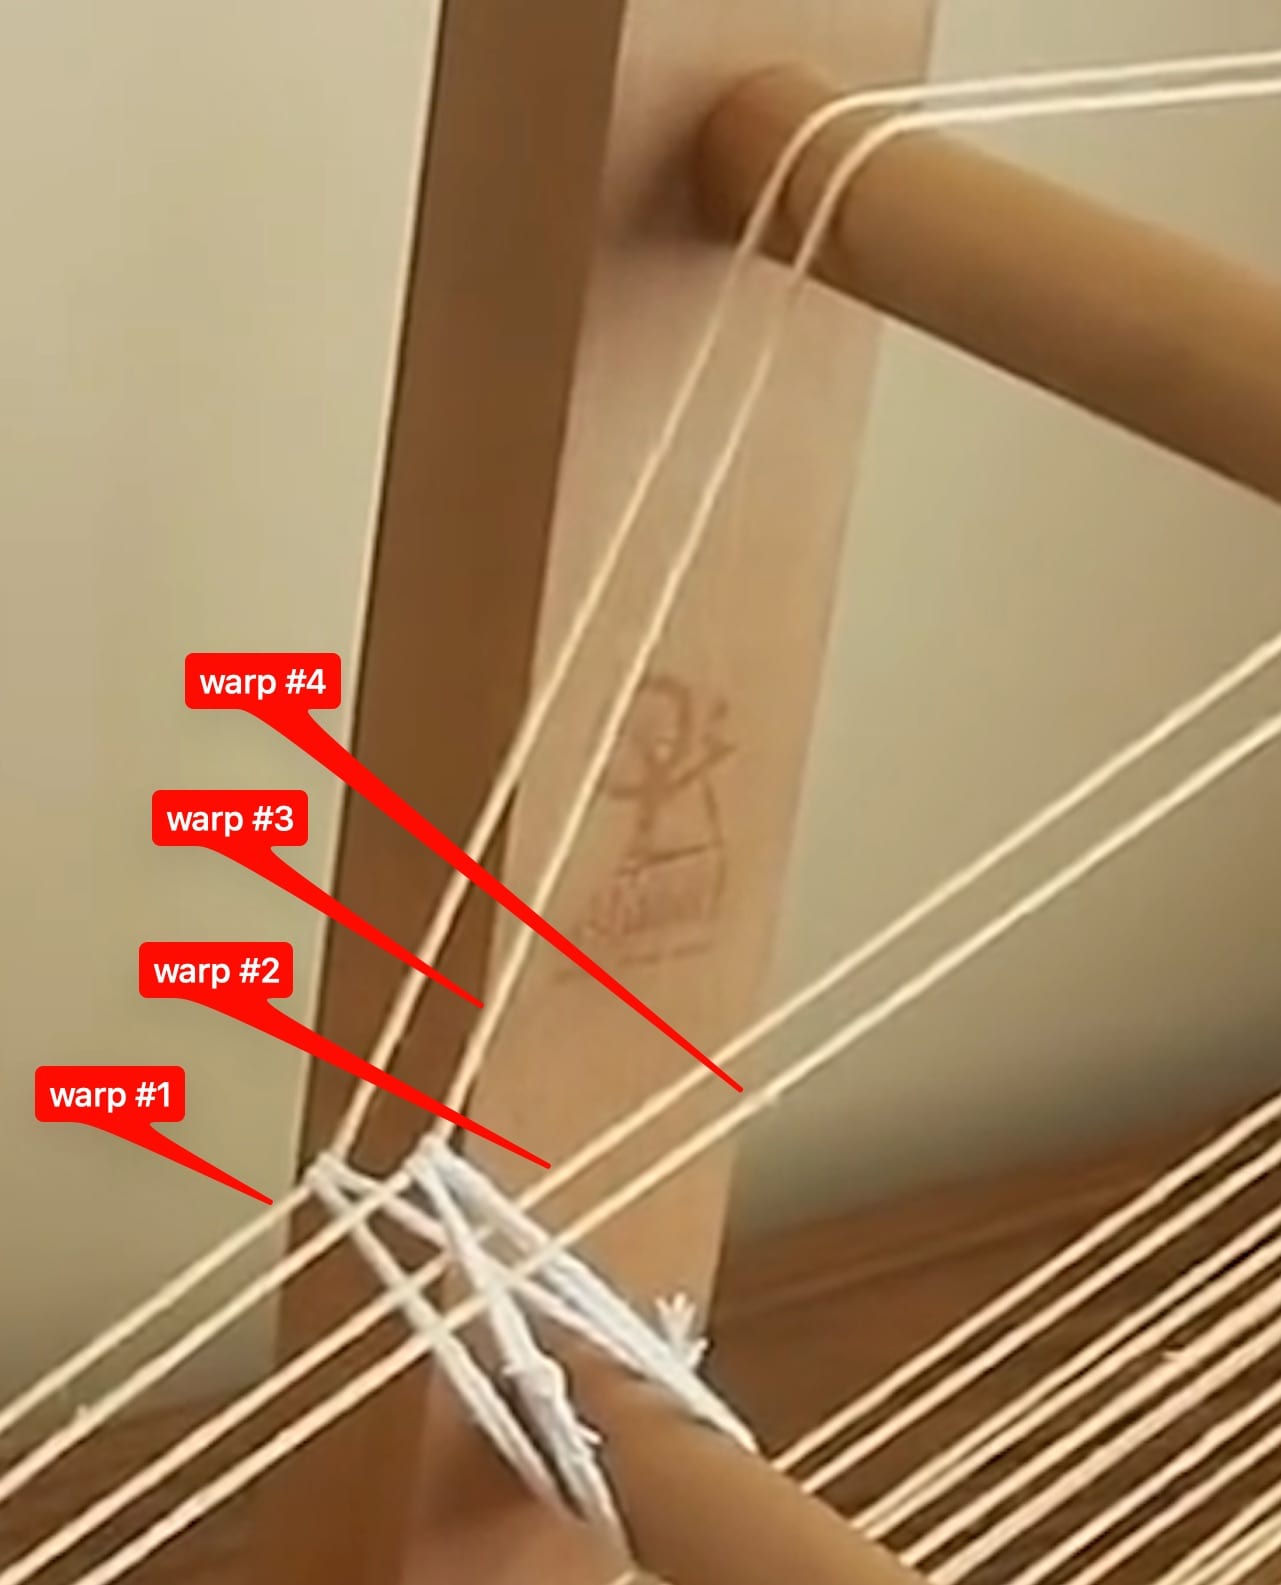
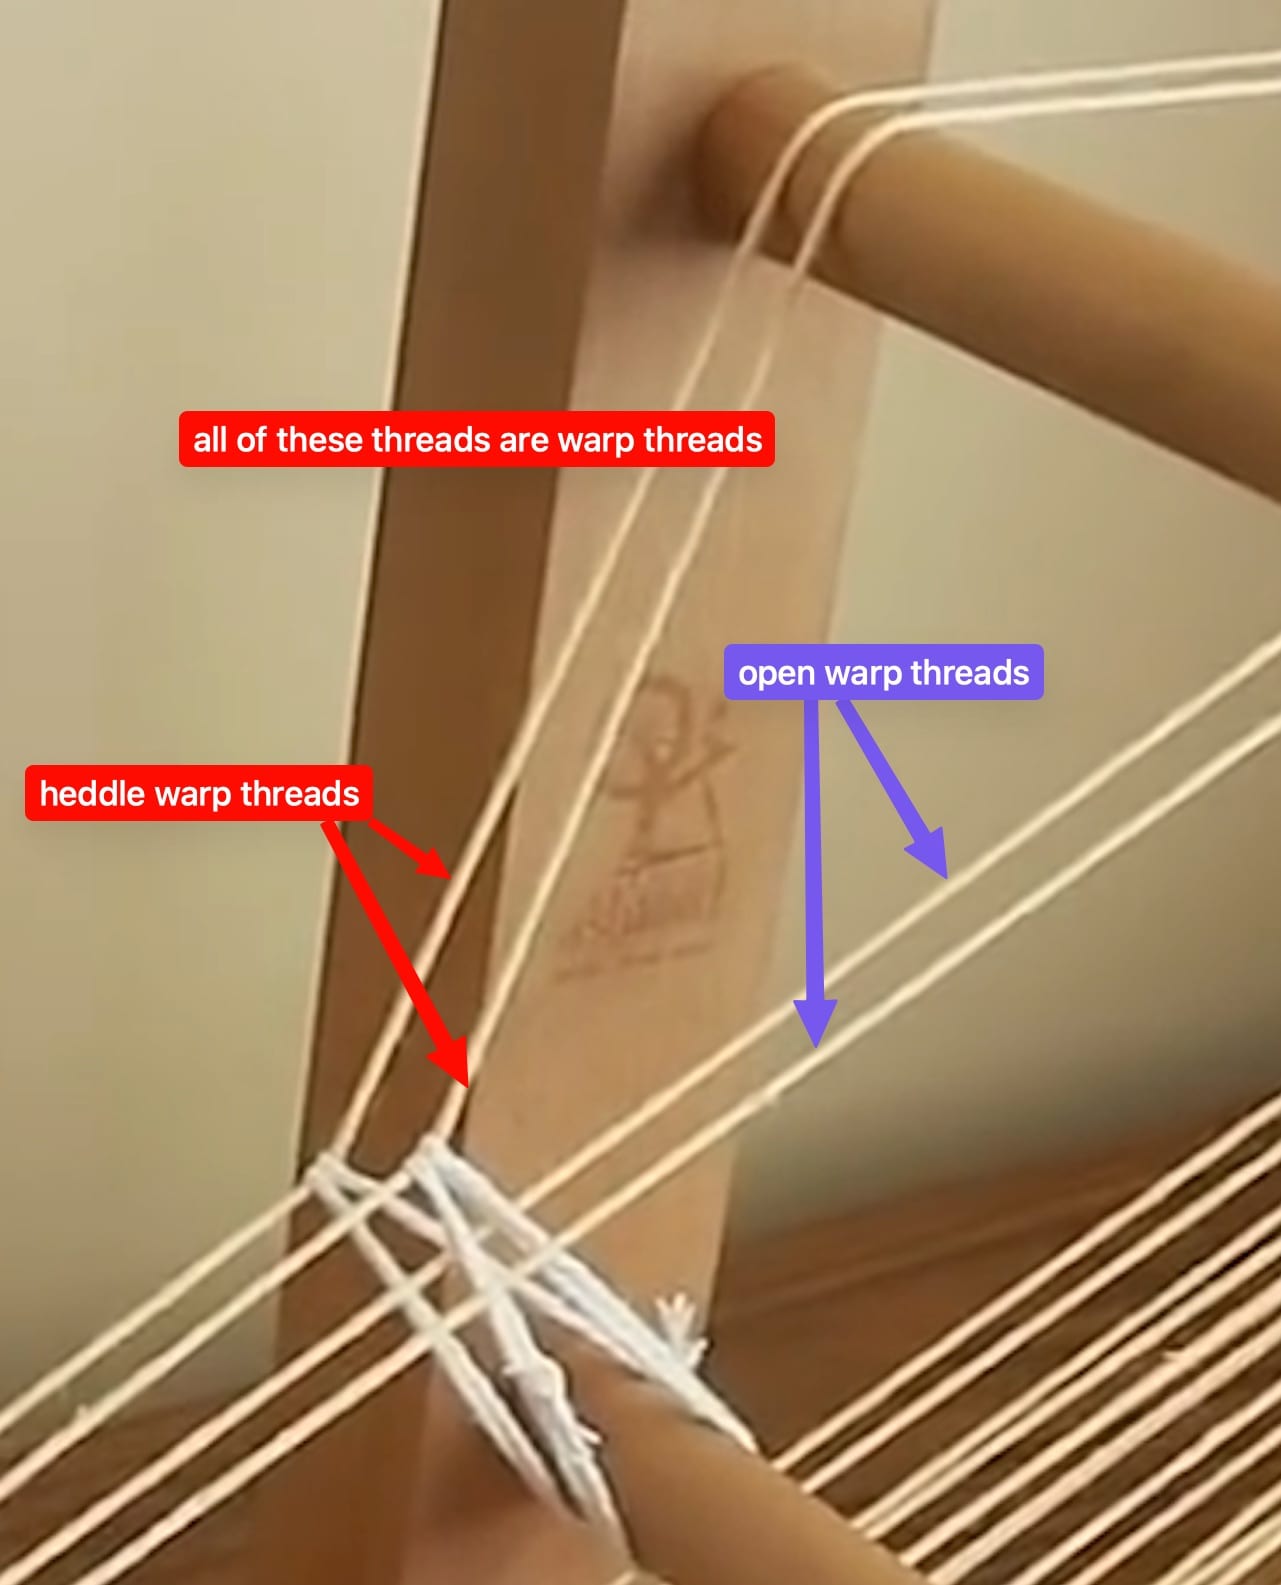
| With four warp threads in place. | Two are "heddle warp threads", two are "open warp threads." | |
 |
 |
 |
Sheds
|
|
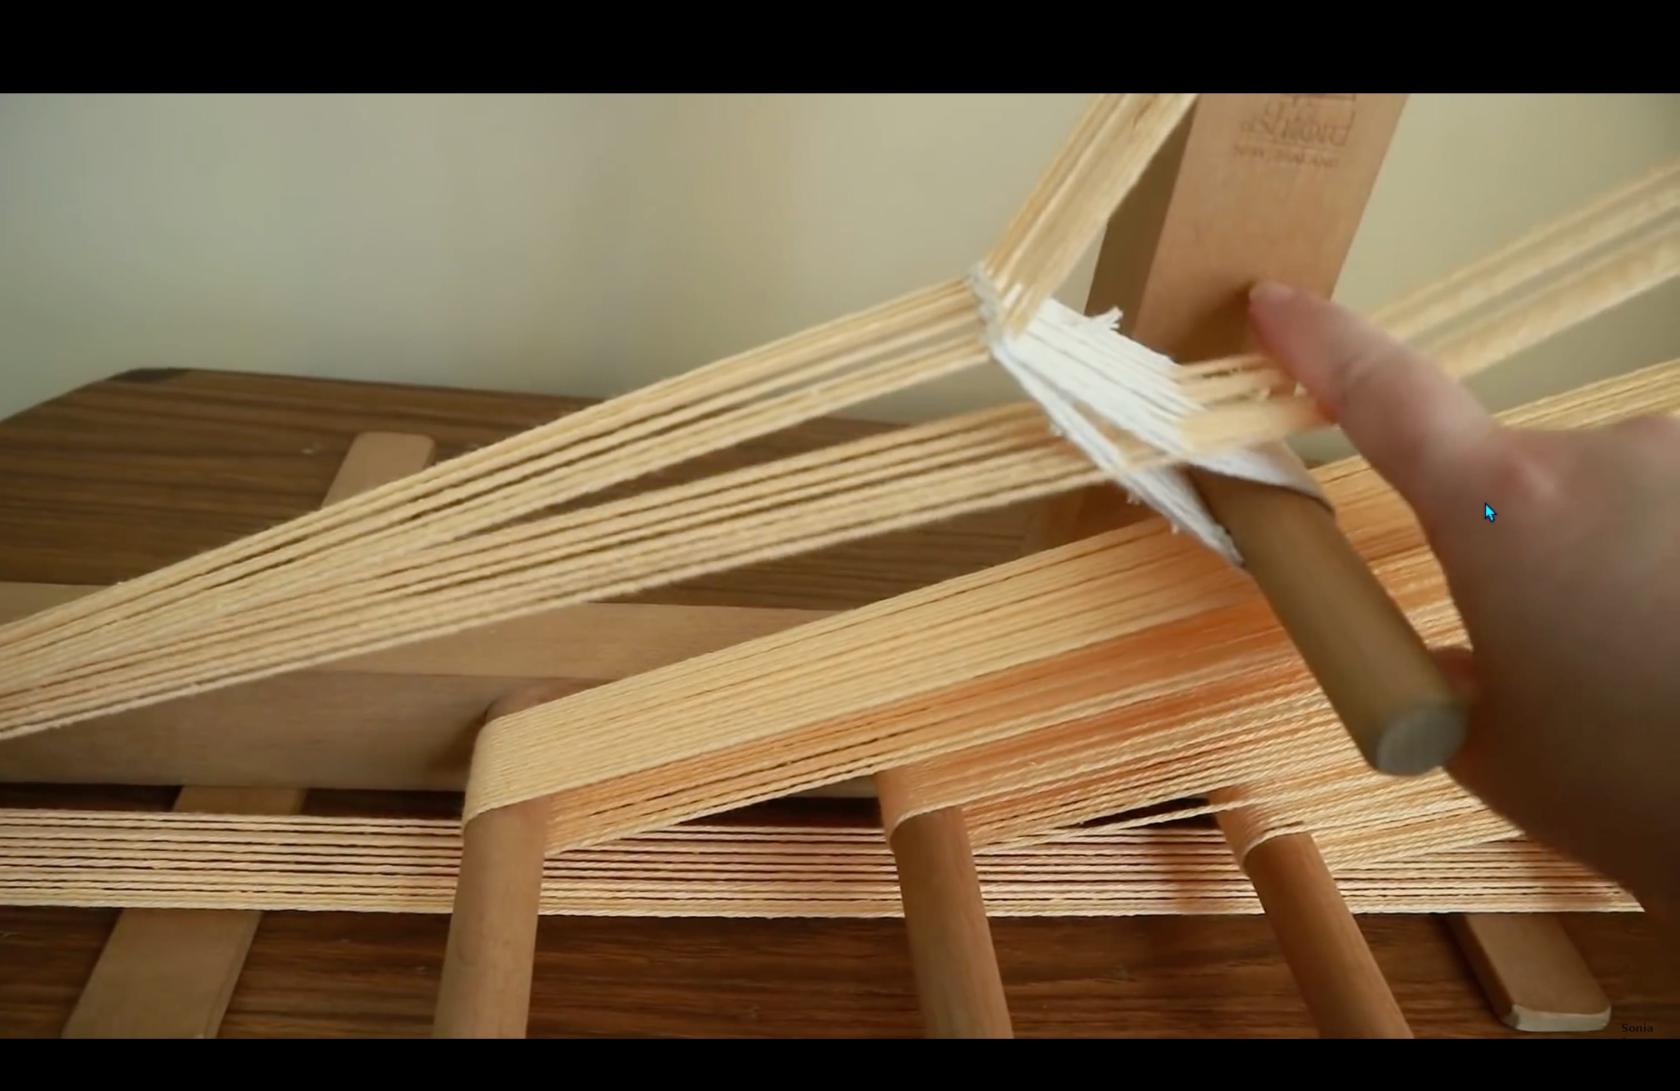
Shed below heddle warp threads. | |
|
|
 |
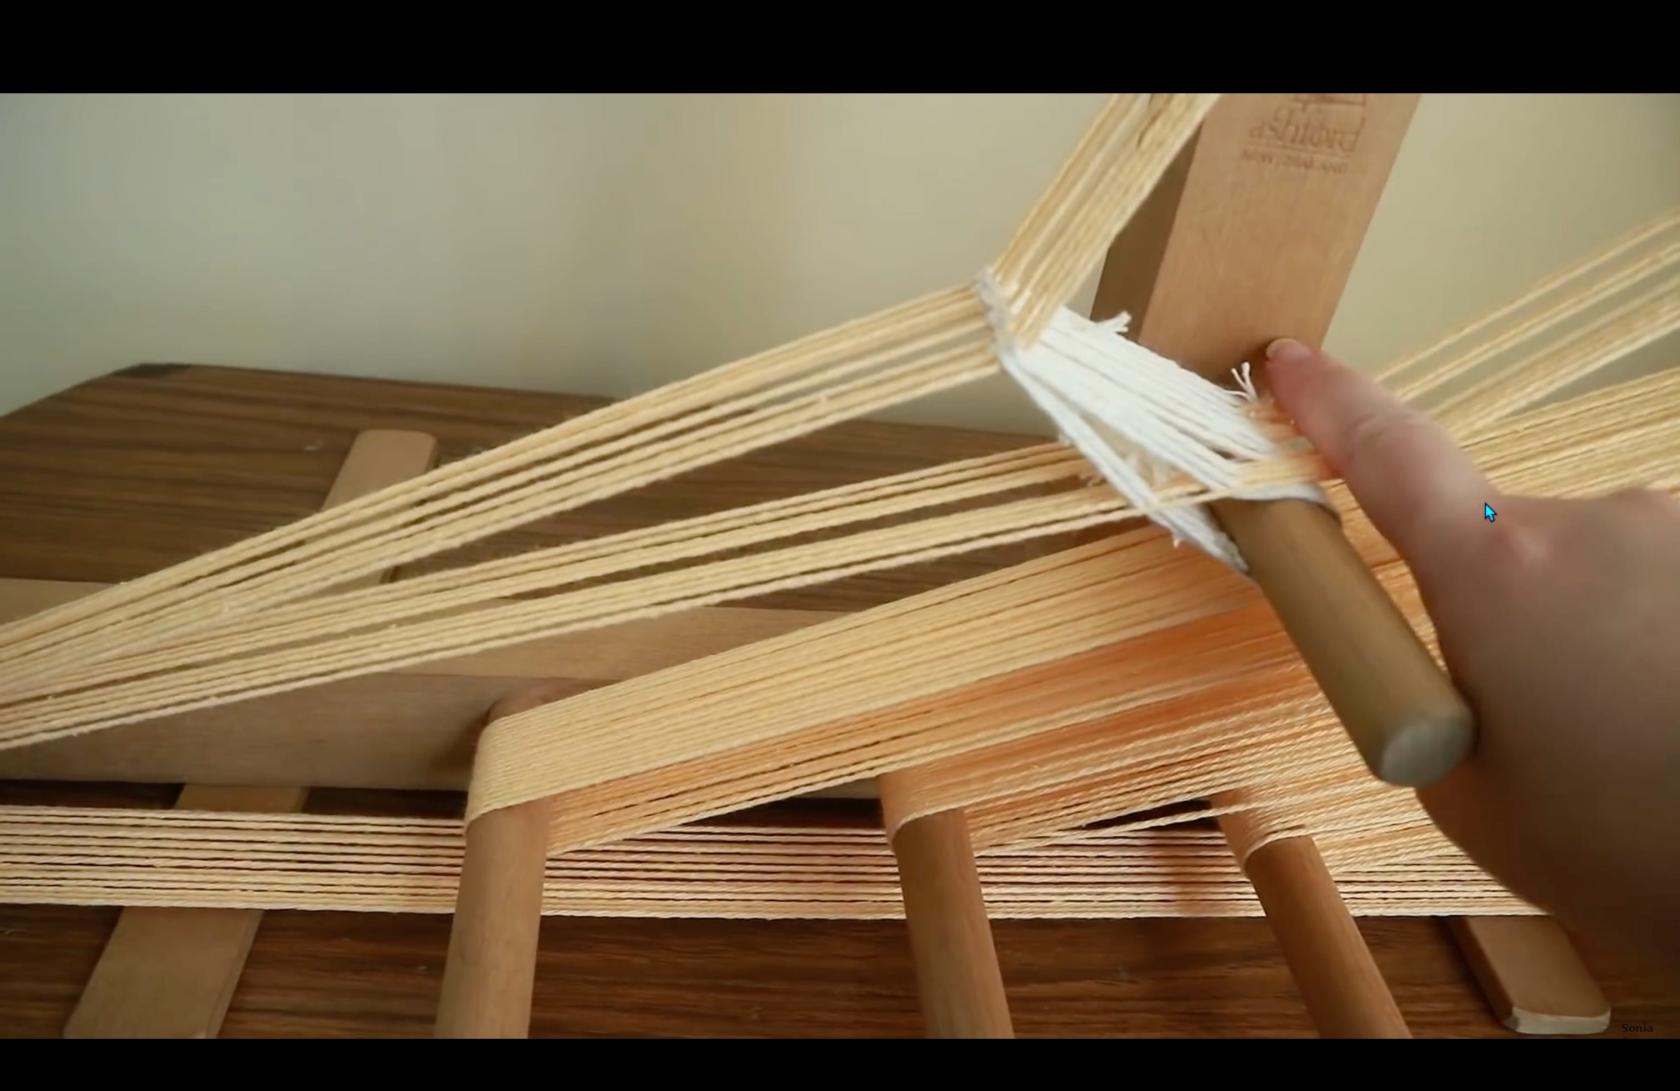 |
The heddle warp threads position are controlled by the heddle.
The open warp threads can be moved by hand, either below or above the heddle warp threads.
The space between the two sets of threads is called a "shed."
| Shed above heddle warp threads. | ||
 |
 |
 |
videos to review
https://www.youtube.com/watch?v=ZoOdTprcCVc
https://schachtspindle.com/products/inkle-loom
https://schachtspindle.com/collections/weaving-tools
https://www.youtube.com/watch?v=i2qNFV3YWJg
https://www.youtube.com/watch?v=2yy6saHjqC4
https://www.youtube.com/watch?v=zyLgy9VgRyY
https://www.youtube.com/watch?v=bMUxG4W4_tM
https://www.youtube.com/watch?v=OPpiyB0tDTg
https://threadcollective.com.au/blogs/weaving-looms/inkle-loom-weaving
https://littlelooms.com/inkle-on-the-fly-tips-for-easy-inkle-weaving/
https://www.instructables.com/Discover-and-Build-an-Inkle-Loom/
https://www.youtube.com/watch?v=PhzBMYzPVW0
https://www.youtube.com/watch?v=8nYpfku1Yjw
https://www.thecreativefolk.com/types-of-weaving-looms/
Contact Mics
Brass/Ceramic elements are available in various diameters 10-50mm, maybe others.
Datasheets for the 12mm ones I bought:
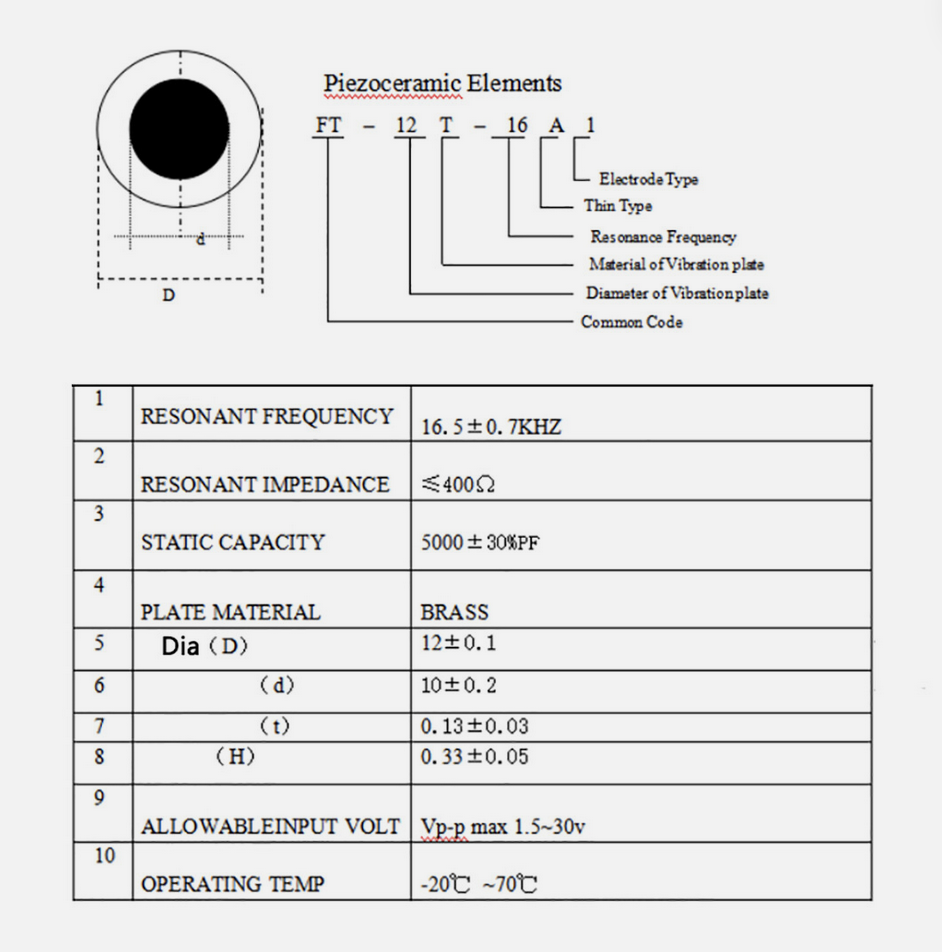
Diagram for simple wiring (open to noise/interference)
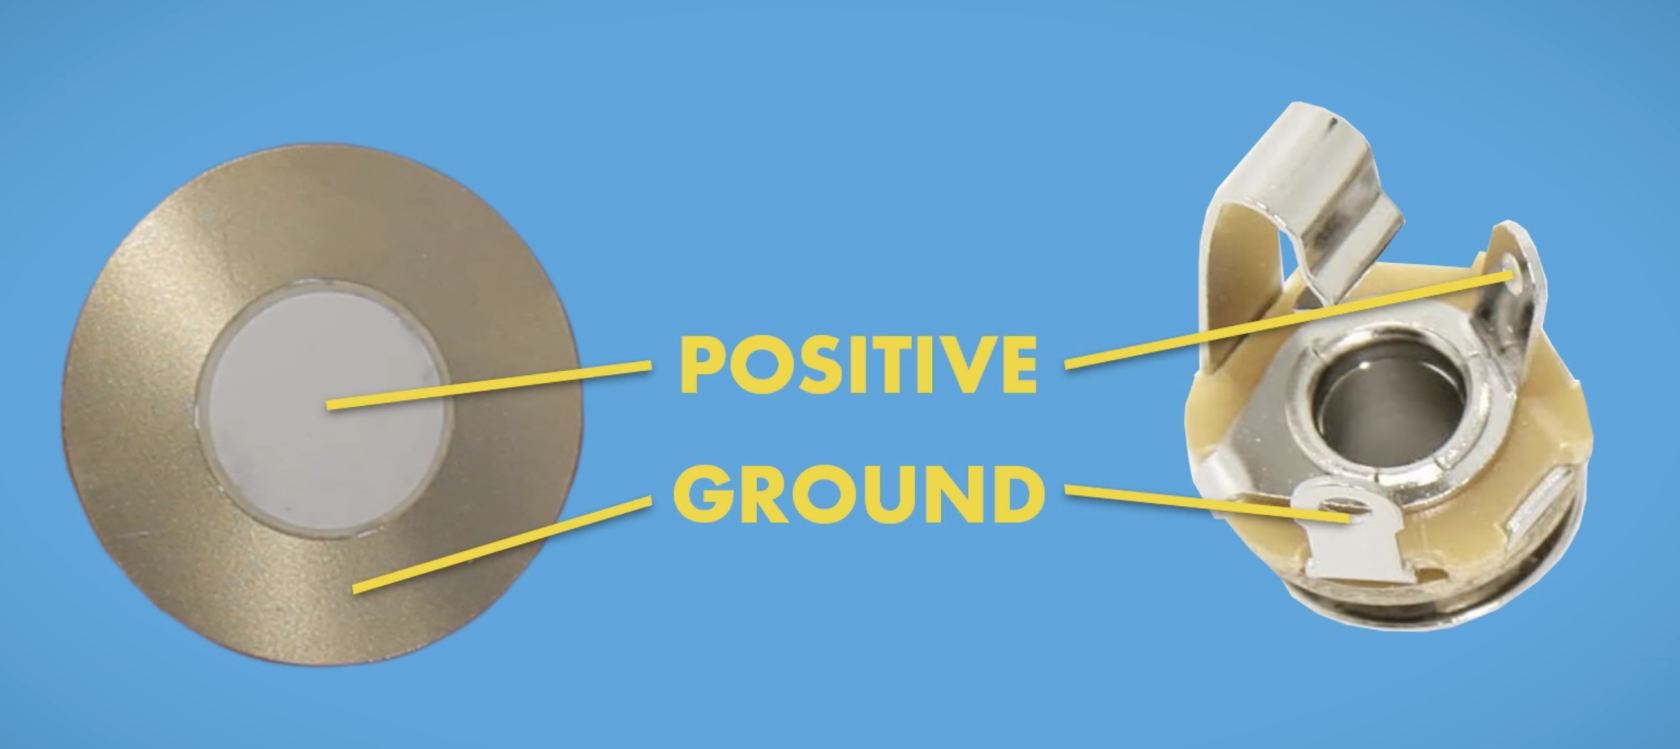
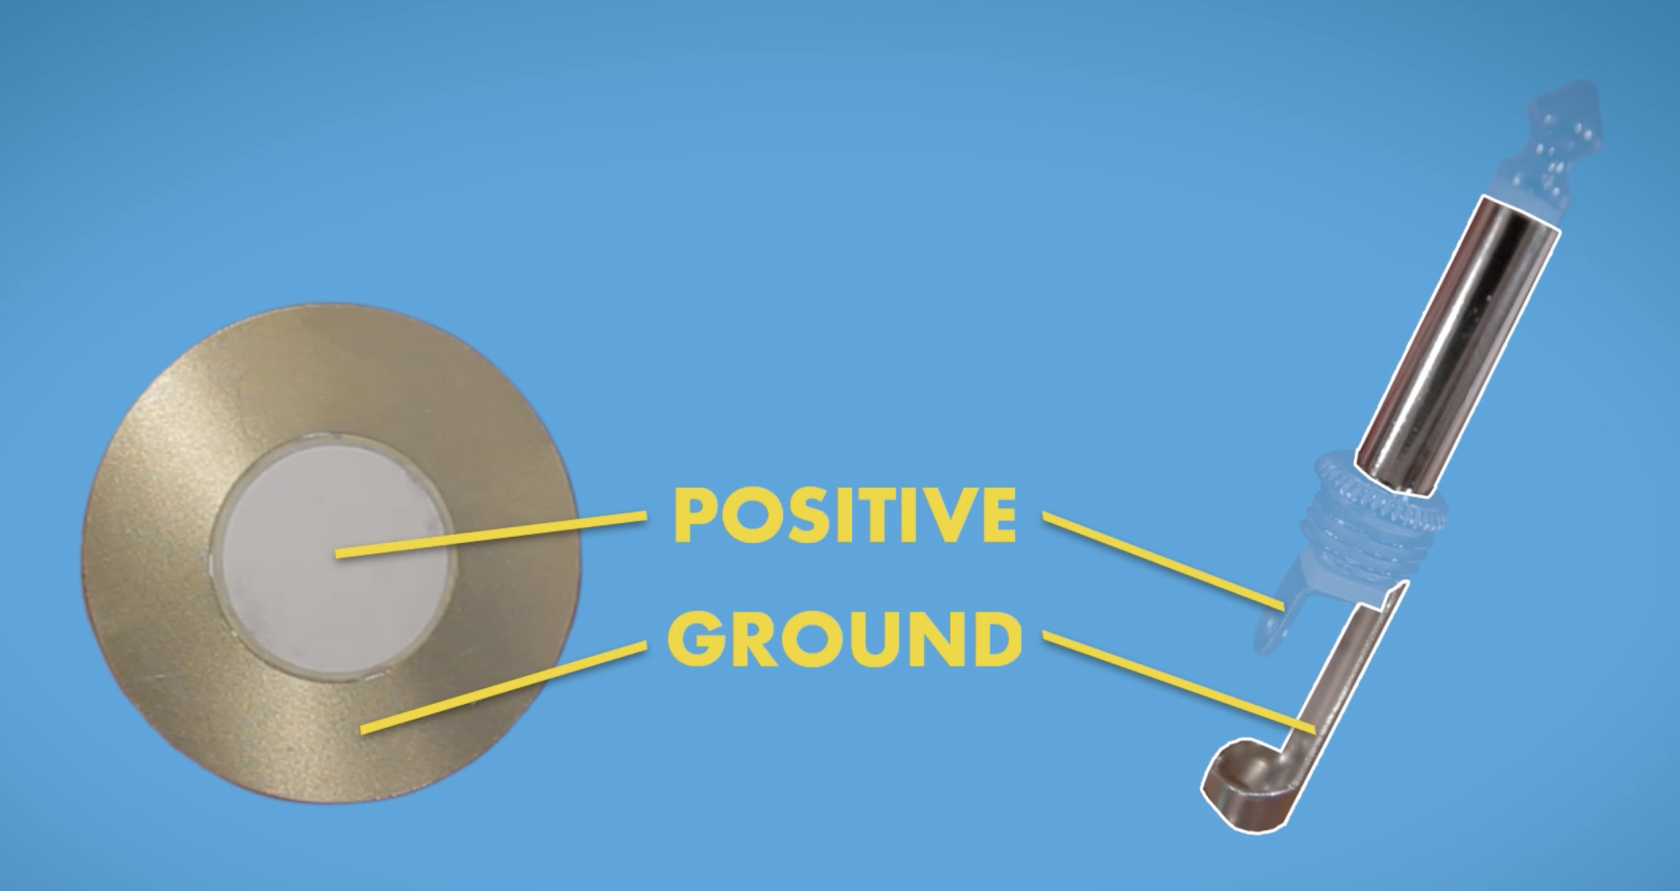
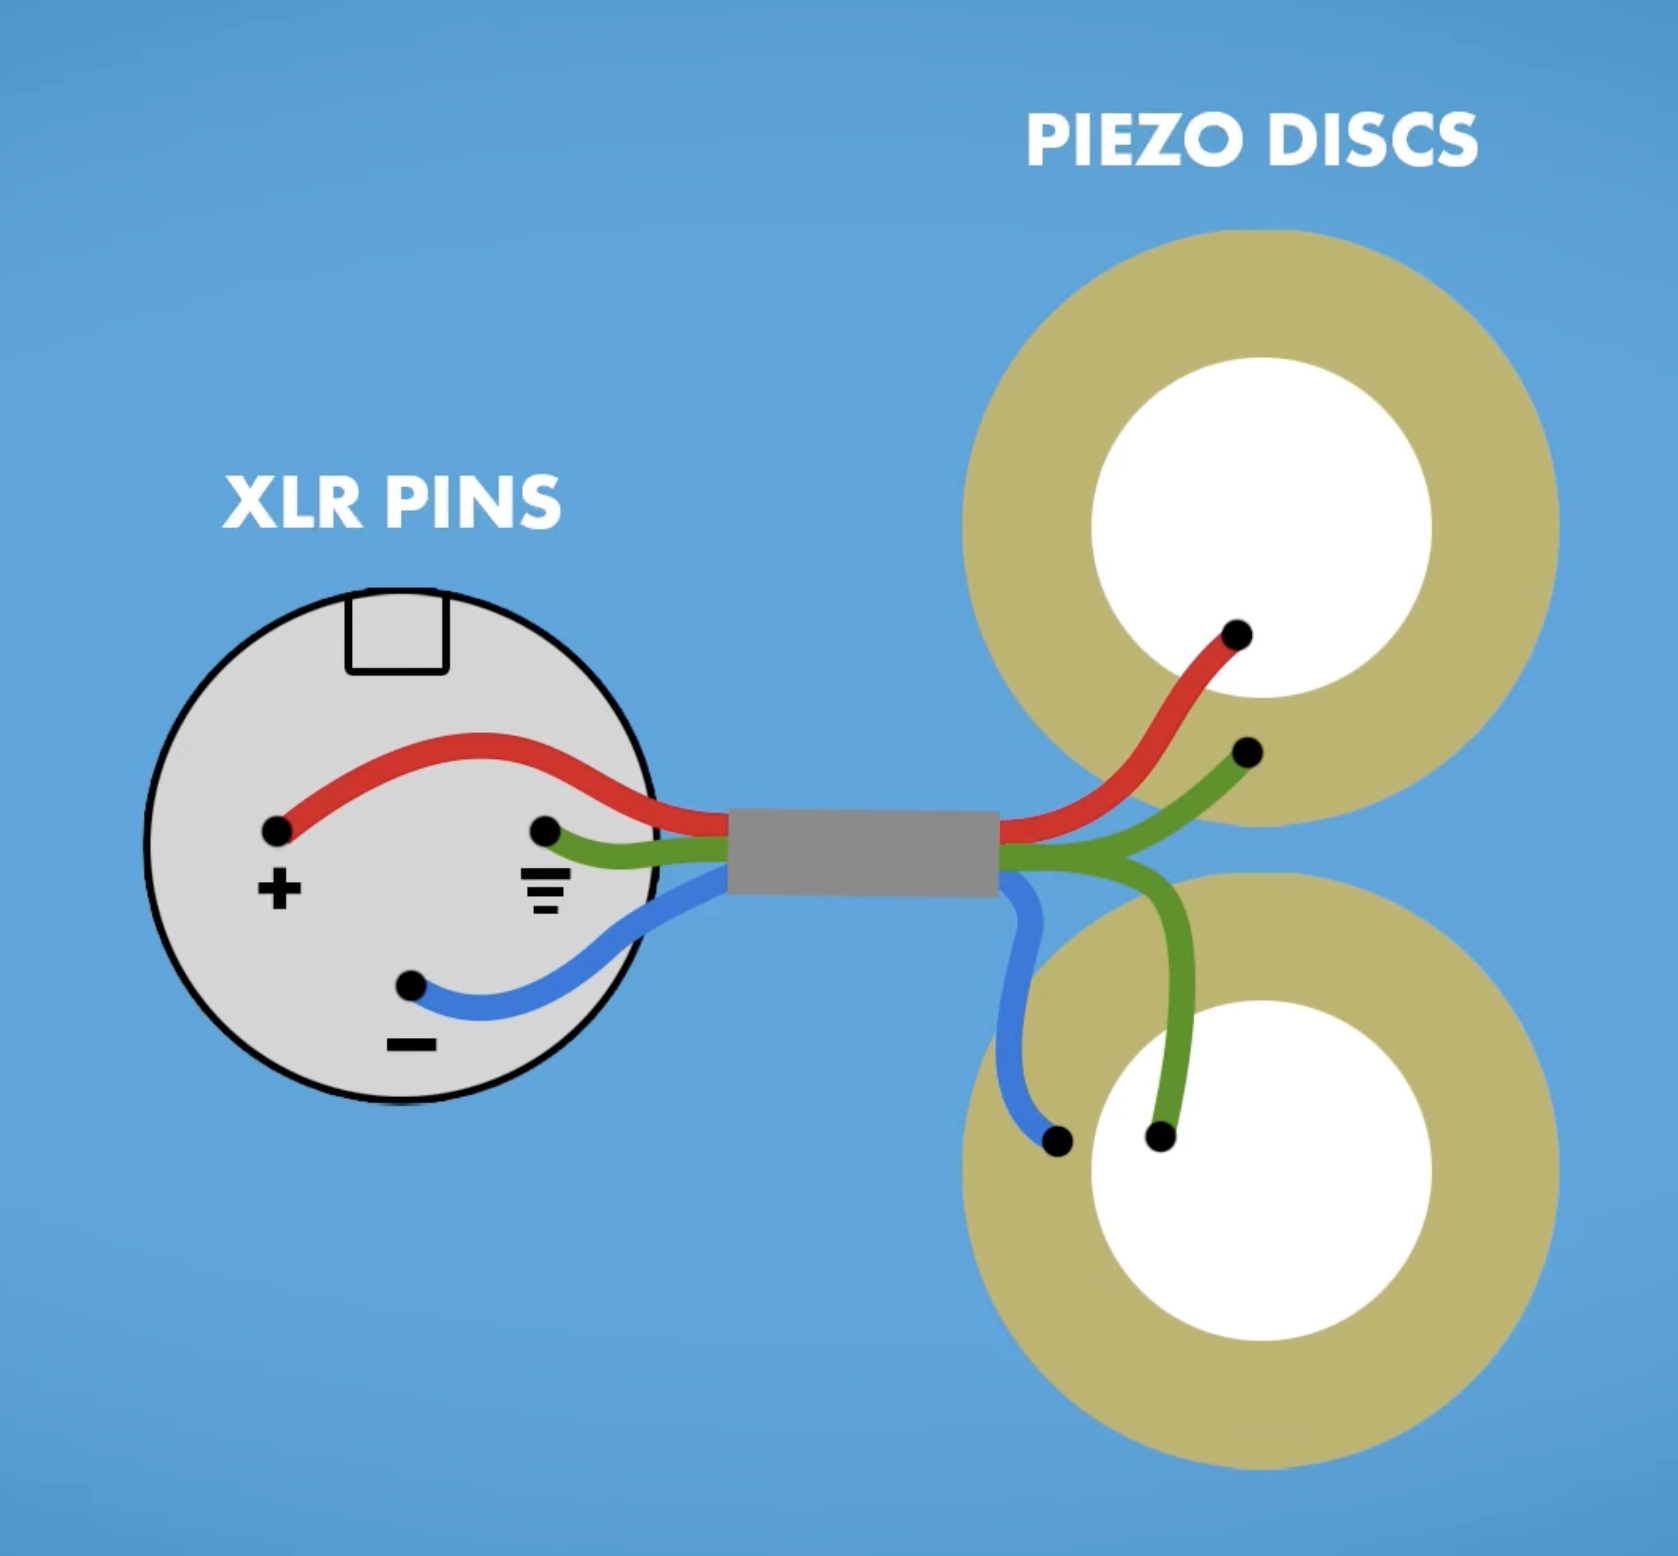
Diagram for balanced wiring
Screenprinting rebuild
Current status
Press - garment
We have one mid-tier press from future space, mounted to a board.
We have one DIY setup made from pieces of a cheap 4-head rotary setup.
Potential wishlist items:
This one looks interesting for 2+ color without the space requirements of a rotary head setup, IF it works well: https://www.screenprinting.com/products/pigskins-pigtails-screen-printer-starter-press#stamped-main-widget
A Riley Hopkins 150 would be nice, but it's $275 new: https://www.screenprinting.com/products/riley-hopkins-150-1-color-1-station-screen-printing-press
Press - paper+
We don't have a "flat work" setup.
Could use standard butterfly clamps, but these look interesting: https://neverthelessscreenprintingsupplies.com/collections/presses/products/ntl-adjustable-off-contact-screen-printing-hinge-clamps-pair
Screen coating & drying
Coating: Unsure of what if any troughs we have re: width and condition.
Drying: has been done inside a 4'x4'x8' tall tent enclosure. It takes up a lot of floorspace, seems like a more space efficient option should be possible.
Exposure
I believe it's been done via clip light with UV bulb, possibly in a cardboard enclosure. Last I heard there was still need for lights off, and a need a better method of coordinating "lights off" time.
Washout
Done in 1FL shower with pressure washer. Water supply is via T under bathroom sink. Electric supply via extension cord running to kitchen. No washout structure has been made to hold screens, or filter outflow.
Curing / Setting
We have a wheeled heat unit for setting, as well as heat gun.
Reclaiming
Also done in 1FL shower. Totally unclear on what we're using for reclaiming. No outflow filter.
Screens
Large variety of salvaged screens, some have patterns burned in that we want to keep, but they're not noted.
Garment press
A single color press will be more space efficient. I've been told we will never get a cheap 4 head machine to register well.
We could start with one, and even maybe get another. Having two might be good for teaching/skillshares etc.
Riley-Hopkins seems to be recommended:
https://www.rileyhopkins.com/collections/riley-hopkins-150-presses/products/riley-hopkins-150-1-color-1-station-screen-printing-press
Specs from site:
- Platen Height: 4.5” (31 cm)
- Platen Size: 16”x16 with neck
- Max Frame Size: 23”x31”
- Base Configuration: Tabletop
- Color/Stations: 1x1
- Footprint (with 16x16 Platen): 20"x40"
- Weight: 28 lbs
Maybe could be set up to bolt down when in use and get hung up when not?
Flat work
Butterfly clamps for flat work, on 1/2" ply.
Maybe poly finished, or a polycarbonate laminate?
https://victorysfactory.com/products/butterfly-hinge-clamps-2-pc-set
https://www.screenprinting.com/products/awt-hc-101-screen-printing-hinge-clamps
For a 20x24 screen, am recommended 26x32 or so (vs a more conservative 21x30)
These could have holes in them for hanging, or be shelved, or slot into a rack.
Looms & Weaving
DIY Loom Reference
3D printable stuff:
Tabletop Weaving Loom Mk I
"This small, tabletop 2-heddle weaving loom is a project that I have been working on for many months now, and I've decided to share it with the world, because I think that the machine is a really cool thing that everyone interested should have access to. This tool has an effective weaving width of about 123mm and can make about 1 meter worth of fabric."
https://www.printables.com/model/1600383-tabletop-weaving-loom-mk-i
Tablet weaving card
There are tons of tablet weaving models on both thingiverse.com and printables.com
https://www.printables.com/model/1417093-tablet-weaving-card
Warp-Weighted Tablet-Weaving Loom V2
This is just a system for tensioned warp holding on a table. Can be accomplished many ways, but this has a printed pawl/ratchet mechanism.
https://www.printables.com/model/1613756-warp-weighted-tablet-weaving-loom-v2
Easy-Peasy Knitting Loom
Jig for making beanies and "bed socks."
https://www.thingiverse.com/thing:7108104
Other Rigid Heddle Looms
Thingiverse.com has many more rigid heddle designs. Some scrutiny is needed to figure out pro/cons of various designs: https://www.thingiverse.com/search?q=rigid+heddle+loom&page=1
Hybrid (printed + otherwise) DIY Plans
DF Loom: A Simple and Flexible Rigid Heddle Loom
"Rigid heddle loom with customizable width and reeds count. Combination of 3D printed parts and aluminum profiles."
Non 3D printed plans
There are sure to be many wood plans, plans that use laser cut pieces, and plans using other hardware store type supplies such as PVC, EMT tubing, etc. Instructables has a few.
Frame Loom Stuff
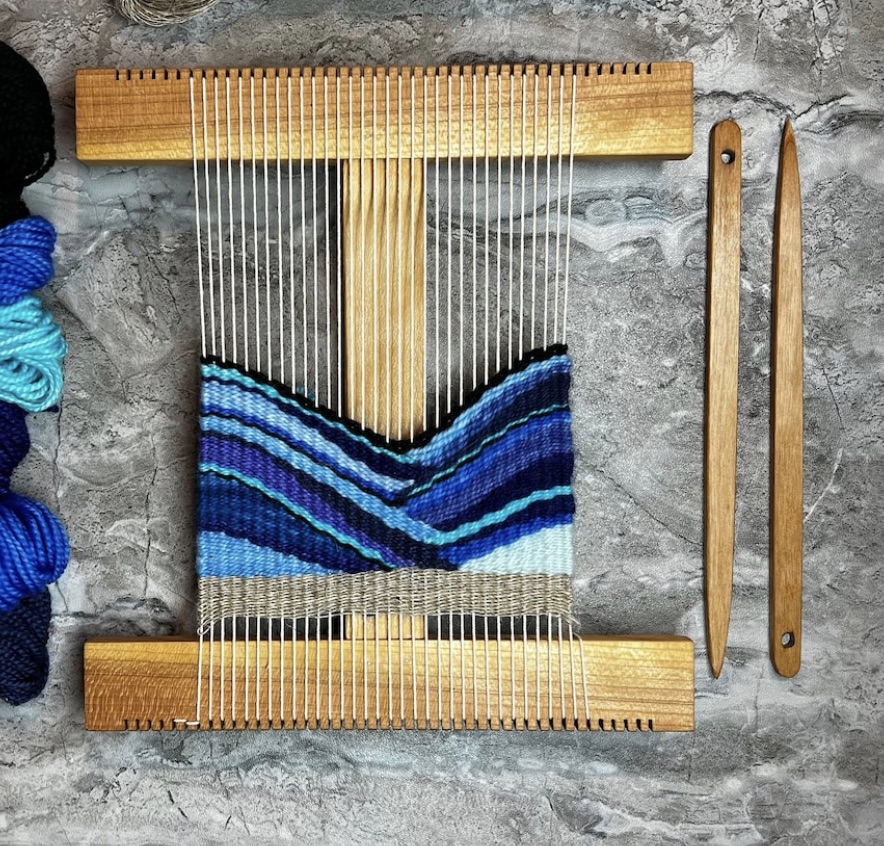
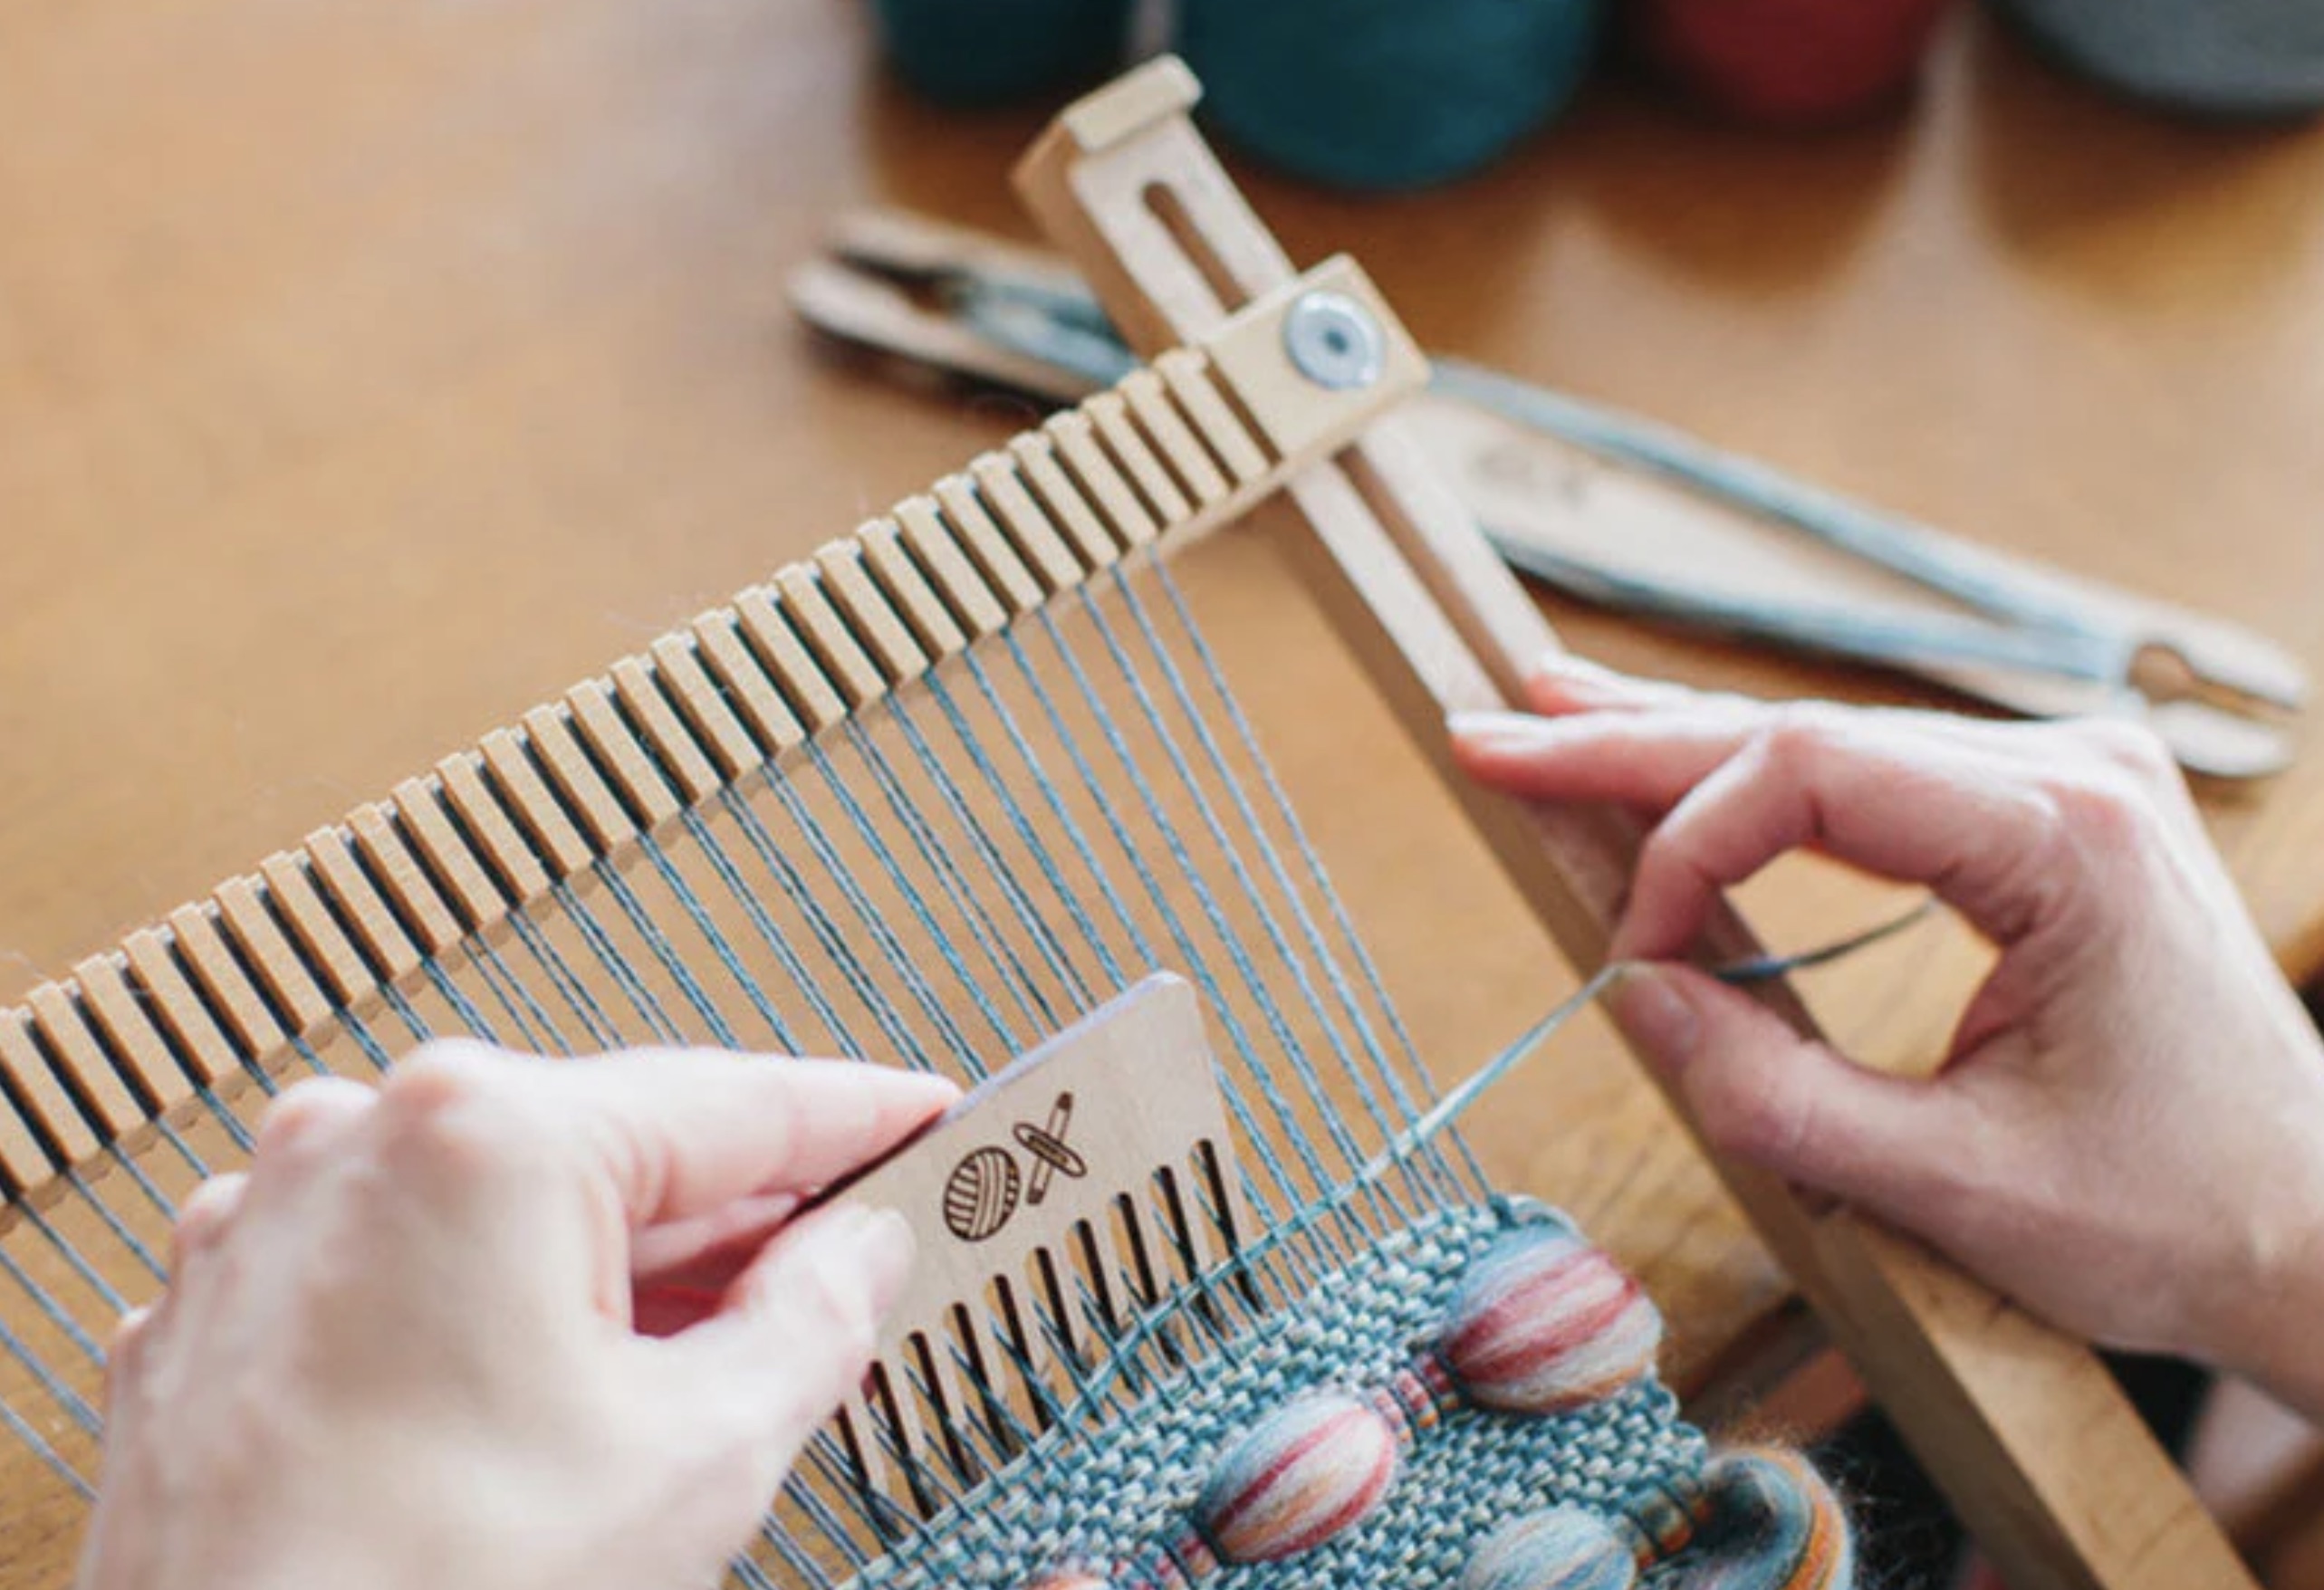
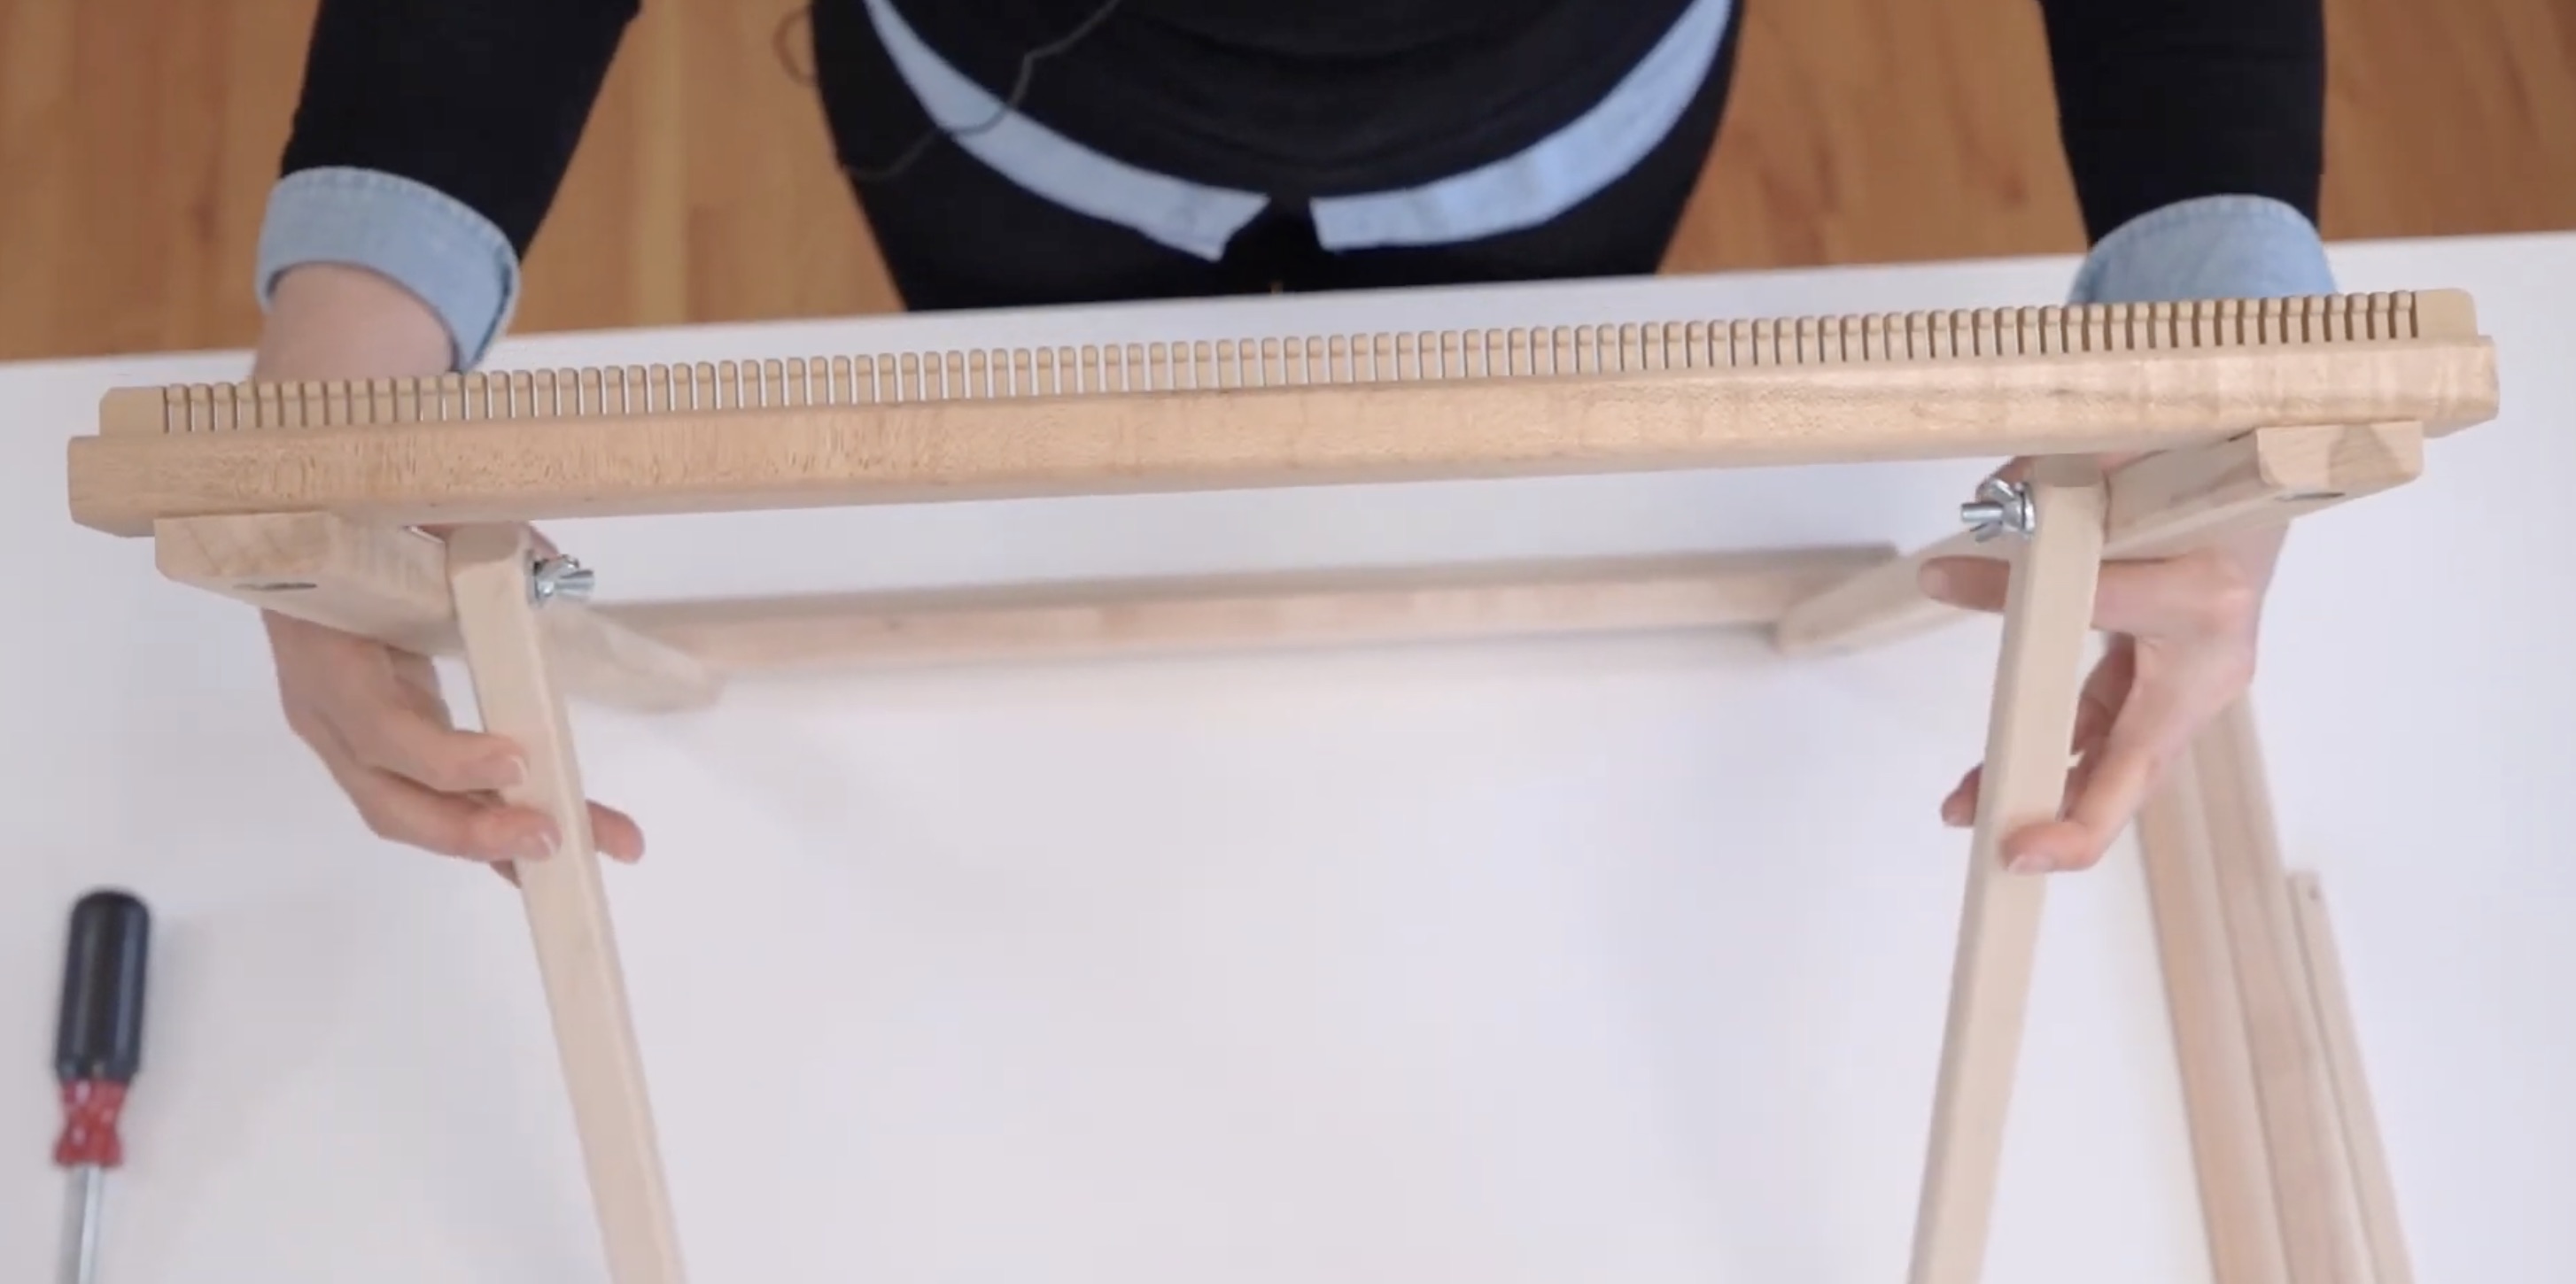
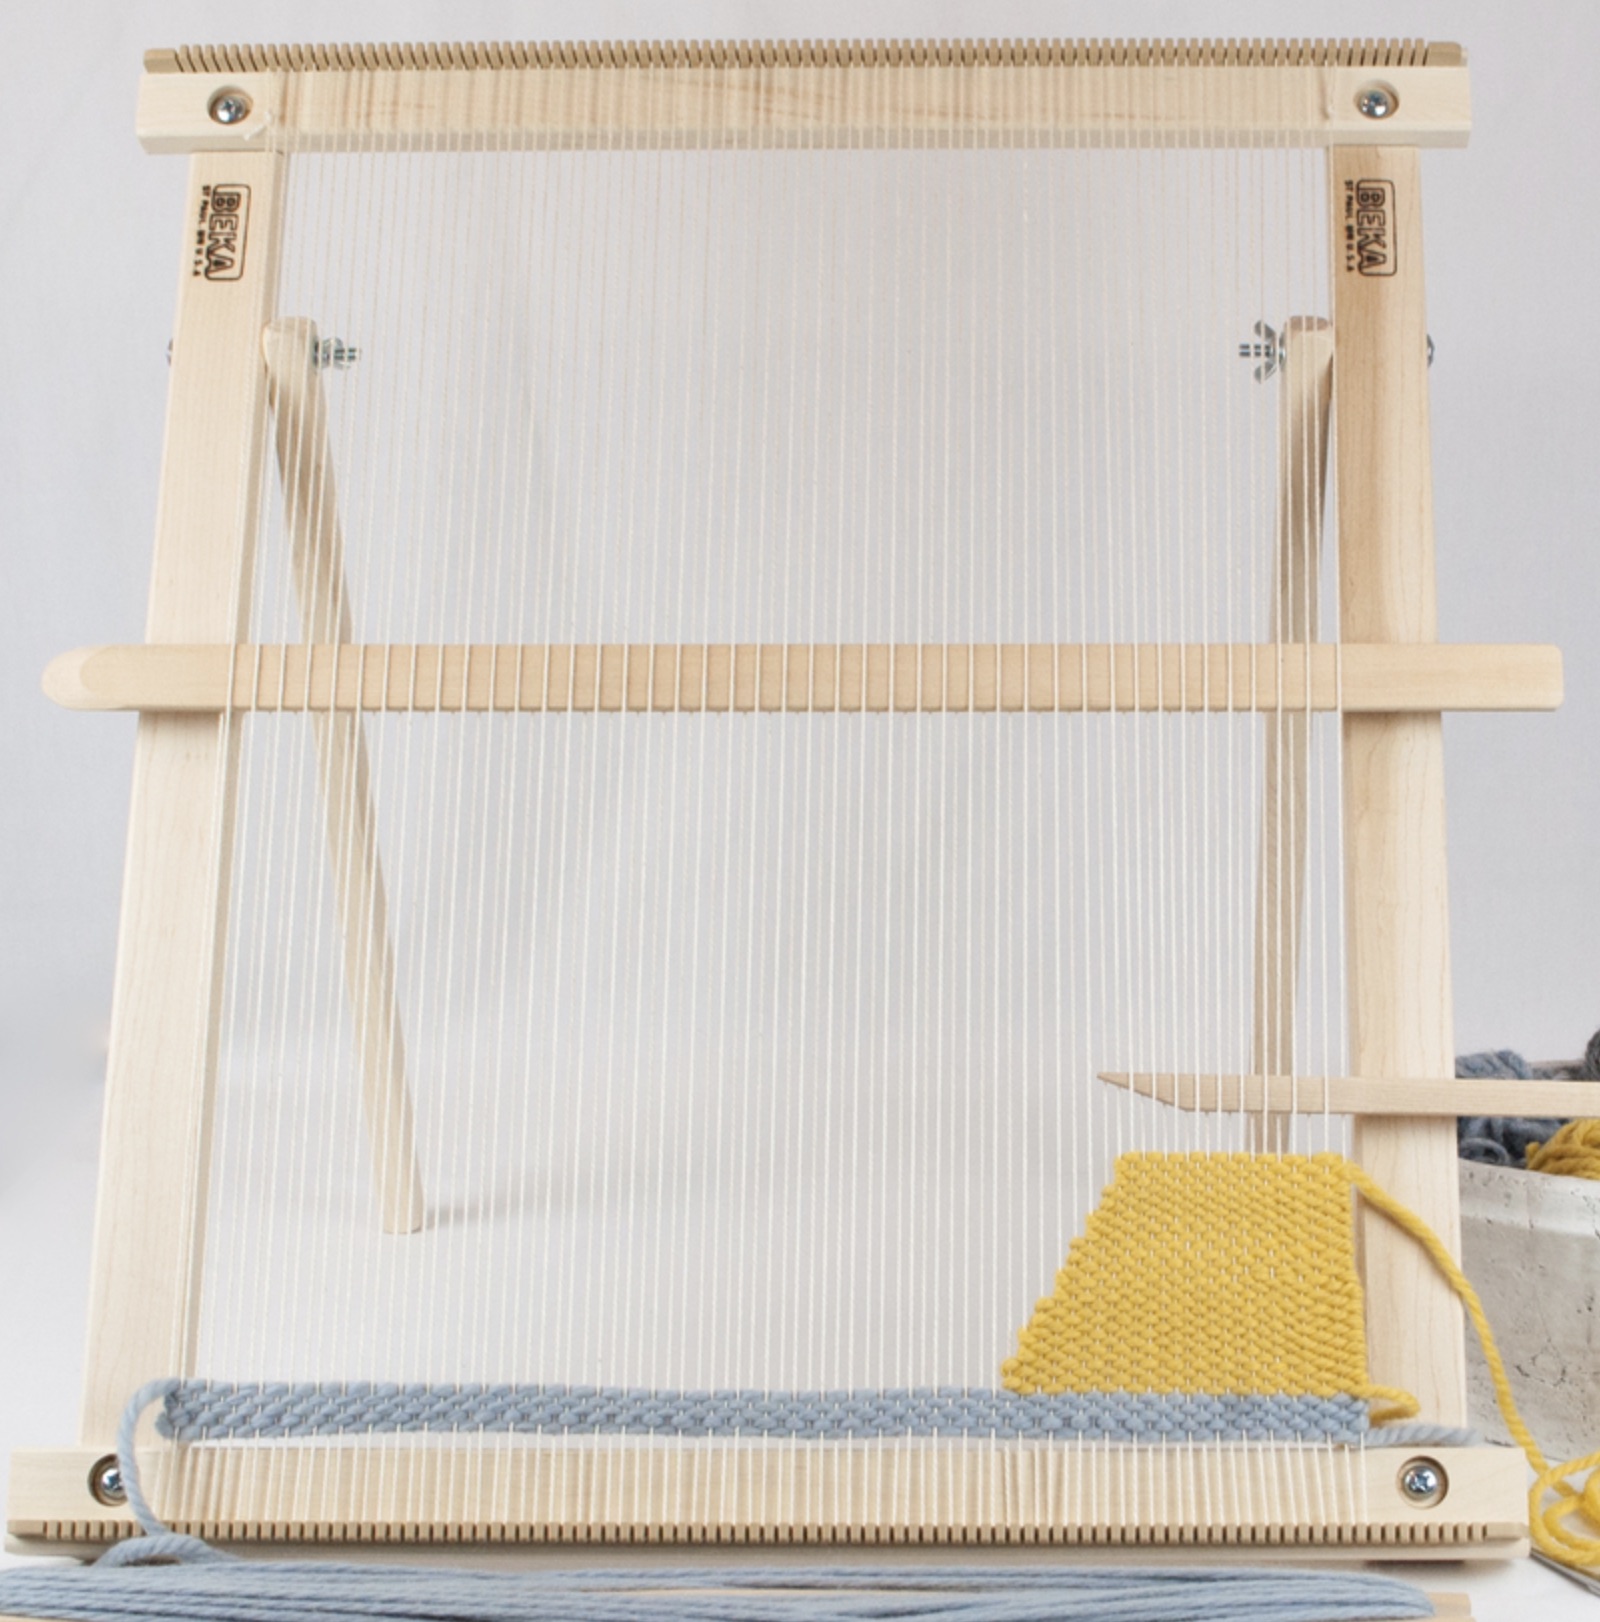
Some images from my research, to be better organized.
Takeaways:
Many frame/tapestry looms use "combs" rather than pins for warping. It's clean, requires no additional parts, but does seem a bit time consuming to cut, regardless of tool and jig used. But a comb doesn't need to be cut into the material, it could be made individually (3D printed or otherwise) and attached to the frame.
Worth noting that comb or pins can be oriented towards the upper face the frame, or top edge, there's no real reason it couldn't even be on the rear side.
5 teeth per inch seems to be a common comb density, but an ideal tpi could obviously vary based on yarn weight.
Presentation Slide Decks
05/07/26 - "Recording 101" - Slide deck
Event slides as PDF here: 2026-05-07 Home Recording Deck.pdf
Resin 3D Printing
Resin Waste Workflow Analysis
Basics
Each use of our Wash & Cure unit requires 6000ml (1.5 gallons) of 90%+ IPA to reach the fill line.
IPA costs:
~$16 locally (for now)
$25 online (cheaper may be available)
Each use contaminates the IPA. The more remaining resin, the more contamination. Surface area matters to an extent, but any print area that allows for pooling: "bucket" shapes, dense textures, or other areas where surface tension will make resin more difficult to drain. It's possible for a small mini-fig to contaminate more than a large smooth object.
Support material can also separate during wash, depositing larger chunks of resin in the IPA, along with "particulate" contamination, which presents (in the extreme) as sludgy/colored IPA.
IPA Reclamation
There are processes to clean the IPA, but they are all imperfect, and do not return to the purchased purity levels. e.g. 90% IPA after some amount of use will effectively become more impure, even after fine particle filtering. At a certain point, distillation (💥) is required to achieve high purity levels. As distillation is both dangerous and laborious, OR expensive $$$$ to buy a dedicated solvent reclaiming unit, let's not do it.
I've seen read that many people who think they're filtering their IPA are removing pigment, while leaving the monomers in the IPA. The only real way to check for IPA purity is apparently a specific gravity test. Formlabs has an entire page dedicated to this.
IPA Workflow Options
Assuming a 10-print cycle is tolerable:
- No reclaiming/no filtering
- ~$40 per 10-print cycle - $4/print, not including resin cost.
- Dirty IPA is (magically) returned directly to IPA storage
- By print #10 it's maybe hard to see your print in the bath.
- Waste:
- 6000ml liquid waste per 10-print cycle with possible supports and other condensed chunks and ooze.
- Paint strainer filtering with 1000 fresh refill
- ~$40 per 10-print cycle - $4/print, not including resin cost.
- 5500ml pump-decanted from top of wash and cure through coffee filter to IPA storage
- Wash and cure bucket is rinsed with remaining 500ml + 250ml fresh IPA, dumped to 1 quart deli container.
- Deli container is cured, and set open in tent near airflow for evaporation.
- Or set outside (where? Future Space? Basement member home?)
- Coffee filter is bagged (along with paper towels?), cured, put in upstairs or outside garbage cans.
- Gloves?
- Waste:
- 750ml liquid waste with chunks and ooze per print (deli container)
- 6000ml dirty IPA at end of cycle.
- ~$40 per 10-print cycle - $4/print, not including resin cost.
Rough particulate filtering
Rough particulate filtering can be done with paint filters.
https://www.harborfreight.com/pack-of-100-60-to-70-mesh-paint-strainers-91376.html
In theory it could just be poured from the wash & cure container, though it might be nice to have something more foolproof and less prone to any sort of accidental spill.
Fine particulate filtering
It's unclear to me if fine particulate filtering matters, as it might be mostly pigment that's being removed.
It could mean a faster path to a print that feels "clean" to the touch, but may still have reduced solvent effect.
Options for fine particulate filtering:
- Coffee filters (these micron ratings are highly suspect, due to AI bullshit and manufacturer bullshit)
- Paper: 10-20-30 microns
- Metal 100-200 microns
- Filter paper
- Down to 1 micron (in flat filter form), depending on material (cellulose, fiberglass, PTFE), though it seems vary. Hard to find cone filters below 10/20 microns. McMaster has one.
Filtering funnel
https://www.etsy.com/listing/942134536/filtering-funnel-downloadable-stl-file
Offers more surface area for pour.
Decanting via peristaltic pump
Whichever method we choose, we'll need to be transporting 1000s of ml of IPA. If we depend on people lifting buckets, it seems only a matter of time till we have a dramatic spill.
A peristaltic pump will allow for more controlled transfer. Peristaltic pumps have the benefit of being able to have the tubing replaced at low cost.
$85 - 1000ml/min
https://ankoproducts.com/products/a200dx
$27 - 1000ml/min
https://www.foreshinefluid.com/products/bp1000-1000ml-min-12v-24v-oem-peristaltic-pump-long-life
$44 - 3100ml/min
https://www.foreshinefluid.com/products/bp3000-high-flow-peristaltic-pump-3100ml-min
Some McMaster options: https://www.mcmaster.com/products/peristaltic-pumps/flow-rate~less-than~50~gal-day/for-use-with~alcohol-3/for-use-with~isopropyl-alcohol/pump-type~peristaltic/
6000ml cleanout
Future Space use
Leaving containers in back yard... Depending on how laissez-faire we want to be, could be a bucket with a lid with holes drilled in it, set in the corner.
Tent evaporation
IF we have sufficient tent ventilation, along with maybe sealing the tent a bit better, could get away with this. With this amount of intentional tent evaporation, we might want to double check that roasting use doesn't cause resin fumes to enter room.
Food Safe Materials
Platinum Cure silicones by Smooth-On listed as "food grade"
- https://www.smooth-on.com/product-line/equinox/
- https://www.smooth-on.com/products/smooth-sil-950/
- https://www.smooth-on.com/products/smooth-sil-960/
- https://www.smooth-on.com/products/sorta-clear-37/
- https://www.smooth-on.com/products/sorta-clear-40/
Smooth-On food safe silicone comparison
Equinox, Smooth-Sil, and Sorta-Clear series
| Product | Shore hardness | Pot life | Cure time | Mix ratio | Color | Trial size price |
|---|---|---|---|---|---|---|
| Equinox - food safe | ||||||
|
Equinox 35 FAST
putty
|
35A | ~1 min | ~7 min | 1A:1B vol | — | $53.78
2 lb
|
|
Equinox 38 MEDIUM
putty
|
38A | ~4 min | ~30 min | 1A:1B vol | — | $48.19
2 lb
|
|
Equinox 40 SLOW
putty
|
40A | ~30 min | ~5 hr | 1A:1B vol | — | $48.19
2 lb
|
| Smooth-Silfood safe | ||||||
|
Smooth-Sil 940
pourable
|
40A | 30 min | 24 hr | 100A:10B wt | Pink | $44.08
2.2 lb
|
|
Smooth-Sil 950
pourable
|
50A | 45 min | 18 hr | 100A:10B wt | Blue | $44.19
2.2 lb
|
|
Smooth-Sil 960
pourable
|
60A | 45 min | 16 hr | 100A:10B wt | Green | $43.82
2.2 lb
|
| SORTA-Clearfood safeskin safe | ||||||
|
SORTA-Clear 37
pourable
|
37A | 25 min | 4 hr | 1A:1B vol | Clear | $46.83
2 lb
|
|
SORTA-Clear 40
pourable
|
40A | 60 min | 16 hr | 100A:10B wt | Clear | $53.08
2.2 lb
|
Prices as of May 2026. Double check all deets before ordering!
Tape Loops
Fascinating deep-dive into various aspects of tape loops: https://www.guerrilladigital.cc/2021/03/10/i-spent-the-last-two-weeks-researching-and-making-endless-cassette-loop-tapes-and-this-is-what-i-learned/
Infinite tape loop 3D printed mechanism: https://www.printables.com/model/1094047-universal-length-cassette-tape-loop
Case working jigs: https://www.printables.com/model/1339383-cassette-tape-work-jigs
Tape splicing block: https://www.thingiverse.com/thing:6753280
Papercraft
Edge Folding Tools and Tips
Gusseted Corners
Thin paper corners are fairly straightforward. Corners folded in thicker materials like chipboard can sometimes not be clean enough if simply folded over, and benefit from what's could be called a "gusseted corner." This technique mimics commercial production as seen on milk cartons.